From halcyon days playing Sonic 2 on the Megadrive, to trying to work out how to make the 'TOASTY!' man appear on Mortal Kombat 3, many of Aaron’s fondest childhood memories are associated with gaming. He regrets nothing. First getting into PC gaming through exposure to Drug Lord 2.0 and then the original Half Life, he has been a fiend ever since. If you need to know anything about gaming laptops, he's your guy.
WePC is reader-supported. When you buy through links on our site, we may earn an affiliate commission. Learn more
Last Updated:
The humble auto clicker for Chromebook is a great tool for helping to give your fingers a rest and increase your Clicks Per Second (CPS) when doing monotonous clicking tasks. They can be useful for gaming, for instance where you need to farm resources like in Rust, Minecraft, or other titles, though beware that if you’re using them in online servers you might get banned for being a cheat.
Other, non-gaming tasks that require repetitive clicking can also benefit from the auto clicker, particularly if you have a disability (permanent or temporary) that hinders your ability to click the laptop / Chromebook trackpad or mouse.
What is an auto clicker for Chromebook?
An auto clicker is an application on your Windows / Mac computer, laptop, or Chromebook that enables you to artificially click your mouse, without you having to do it yourself. You can usually change the speed of the clicks to be faster than a human can physically manage (or set a large time gap between each click if you prefer), as well as the spread size of the clicks on the screen and the rhythm in which the clicks are carried out. This can be useful in games or in other scenarios where repetitive clicking tasks take place.
How to download and use a free auto clicker for Chromebook
Download auto clicker for Chromebook
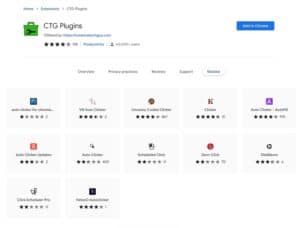
The best solution to get an auto clicker for Chromebook requires you to download CTG Plugins (courtesy of the Creative Tech Guy) which is a ‘collection of simple plugins to improve your web browsing experience’. These extend beyond autoclick, but you can enable/disable them as you like when you click on ‘Add to Chrome’.
Step
1
Download CTG plugins
Find CTG Plugins on the Chrome web store. Click ‘Add to Chrome’.
Step
2
Enable Auto Click
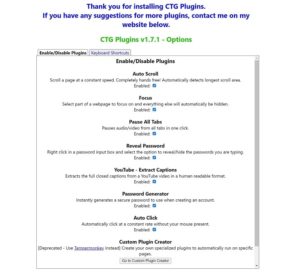
Untick all of the plugins you don’t want, ensuring that Auto Click is ticked to Enabled.
Enable the auto clicker for Chromebook on your system
Once you’ve installed the CTG plugin, follow the below steps to setup the auto click on your Chromebook.
Step
1
Open the System Menu
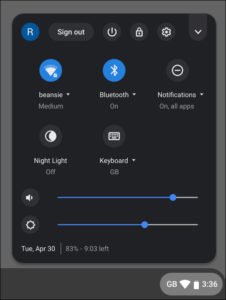
In the bottom-right corner of your Chromebook’s desktop, select the Time icon which will open the System Menu. The same action can also be accomplished by pressing the Alt + Shift + S keys at the same time.
Step
2
Navigate to the menu
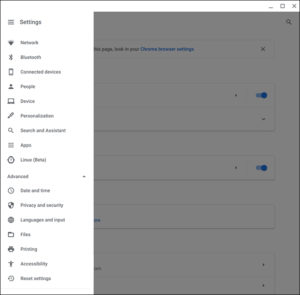
Click the Settings cog wheel icon and then navigate to the Menu. Alternatively, access More Menu Items by opening Advanced settings.
Step
3
Manage Accessibility Settings
Select Accessibility then click Manage Accessibility Settings/Features.
Step
4
Mouse and Touchpad
Click on Mouse and Touchpad.
Step
5
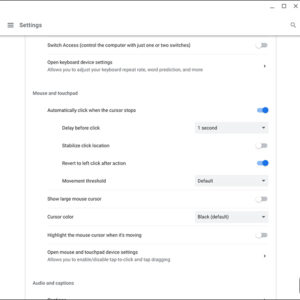
Automatic Clicking when the mouse pointer stops
Turn on the slider Automatic Clicking when the mouse pointer stops.
Step
6
The cursor ring will now appear
A ring will now appear next to your cursor whenever it stops moving: if it does not move for a predetermined amount of time (depending on the customized settings – see below), then the automatic clicker will commence.
How to customize the auto clicker for Chromebook
- Delay before click: This is the amount of time you can leave the cursor stationary before it will start auto-clicking. Click on Delay and a drop-down menu will appear from which you can choose a delay between 0.6 – 4 seconds.
- Stabilize click location: Selecting this will cause the ring to remain stationary until you move the cursor outside of it.
- Revert to left click after action: When this option is enabled, the click action reverts to a left click after you perform a different action, such as a double-click or right-click.
- Movement Threshold: The amount you need to move the cursor, before leaving it stationary, for the autoclicking to commence.
The Click Action menu
After selecting Automatic Clicking when the mouse pointer stops the standard action will be a left click. If you want though, you can choose a different action from the click menu. In order from left to right, these are as follows:
- Left click
- Right click
- Double click
- Click and drag
- Scroll (around the screen)
- Pause automatic clicking
- Toggle menu position (moves the menu around the screen).
Other Chromebook articles
- Best Chromebook 2022
- Friday Night Funkin Chromebook
- Chromebook won’t turn on? How to fix it
- How to connect AirPods to Chromebook
- How to screenshot on Chromebook
- How to screen record on Chromebook
- How to restart Chromebook
- How to copy and paste on Chromebook
- How to right click on Chromebook
- Caps lock on Chromebook
- How to delete apps on Chromebook
Final Word
This has been our guide on how to download and enable auto clicker for Chromebook devices. We hope it’s helped you to give your weary fingers a rest. Do be sure to check out our other laptop guides and articles, including other how-to guides, and also buyer’s guides on specific laptop and Chromebook brands.

