
WePC is reader-supported. When you buy through links on our site, we may earn an affiliate commission. Learn more
Last Updated:
PC gaming is considered enthusiast-level, with gamers on this platform generally spending more money and time on the hobby they love. Here at WePC, we have always championed the ‘build your own PC‘ mantra thanks to the three main benefits of saving money, learning a new skill, and the satisfaction that comes from completing a computer build. How to build a gaming PC is no different from building any PC, only there may be a few extra parts in the gaming variety.
If you are new to the PC building world, you needn’t worry, we are going to run through everything from component definitions and what they do in a PC, all the way to what parts you need for your build, and what tools are required. The process can seem quite daunting all the way through but you can rest assured that this how-to article is comprehensive enough to guide you the whole way. Take your time, enjoy the build, and start playing games.
By the end of this article, you will have everything you need to complete your PC build, no matter if you are creating the best gaming PC or budget gaming PC. You may have considered buying yourself the best prebuilt gaming PC from a custom PC builder, however, you should always look to build your own first.
Here’s a quick snippet as to what we will assist you in:
- Finding the best components for your PC build, with a budget and your personal requirements (the games you play) in mind
- Understanding how each PC component works and why they are important
- Grabbing the right tools for the job and preparation for the PC build
Here’s a how to build a gaming PC video to assist you during the process.
Latest PC build & hardware news
DigiTimes reports that AMD Zen 4 CPUs could be released as early as September 2022, this will most likely be following an announcement at Computex 2022.
- Zen 4 CPUs will only support DDR5 at launch
- AMD Zen 4 Ryzen 7000 series have entered pre-production
- GPU pricing is still above MSRP so late in the life cycle
- RDNA3 GPU specifications rumored – Navi 31, 31, and 33
Some things to consider before you start building
Before anyone builds a PC, there are a few things you need to consider. First, you need to ensure you understand your own needs in relation to the components you can afford to buy. After reading this section, you’ll know whether building a gaming PC is right for you (it almost certainly is) or if you should go with a prebuilt machine instead.
Choosing your budget & understanding your needs
How much is a PC? Start by setting yourself a budget, component prices can vary dramatically depending on what you want from your PC, so you’ll need to think about whether you want to build an entry-level, mid-level, or high-end gaming PC.
What’s the difference between these levels, though? And what impact does each level have on your budget? We’ll explore this in more detail below but, to give you a brief insight into the estimated budget for each level, check out the table below:
| PC Level | Estimated Budget |
|---|---|
| Entry-Level | $300 – $600 |
| Mid-Level | $600 – $800 |
| High-Level | $1000+ |
Entry-level
A $300-$400 budget will allow you to build a gaming PC that can run certain games (such as esports titles) in low settings but won’t be enough to build a PC that’s suitable for playing AAA or high-definition games.
This is fine if you’re looking to build a PC specifically for playing older titles, but you will need to remember that building an entry-level gaming PC is going to severely limit the choice of games you can play, as well as the quality of the games themselves.
Spending between $500-$600 on your gaming PC build will allow you to invest in a graphics card or a more powerful processor. This means you’ll be able to play some modern AAA games, however, these will need to be played with lower graphic settings.
So, while it might be a better choice for anybody working with a lower budget, it’s often a better idea to hold off until you’ve got a little more money to play with. You’ll then be able to build a gaming PC that can give you a much better performance.
Mid-range
If you want to play modern titles and even enjoy the world of VR gaming, a budget of $600-$800 will be your minimum spend. Higher graphic settings of 1080p are achievable within this price range, as well as higher FPS counts of around 144+.
You’ll even be able to add multi-threading to your PC’s list of features if you choose to go with an AMD processor. This further enhances the gameplay of certain titles and gives you more versatility over the range of titles your PC can play.
High-end
With an $800-$1000 budget, you’re going to be able to build a super-powerful PC that is capable of much more than just simple gaming. You’ll be able to purchase components that give you powerful performance when playing with maxed-out settings upwards of 1440p.
Spending $1000 plus on your PC build will give you all of the above performance as well as giving you the ability to play games with high-definition, 4K graphics. Heavier workloads tasks such as streaming and video rendering will also be handled with ease.
So, as you can see, the minimum budget you’ll need to build your own gaming PC is $300. This will give you an entry-level PC, though, so if you’re looking to play modern games or anything with 4K performance, you’ll need to put aside a lot more money.
This doesn’t cover any peripherals like monitors, mice, or keyboards though – so this is something you’re going to have to factor in, too.
What is a good budget for a gaming PC?
The higher the better isn’t always the best course of action. After a certain point, the returns of your PC build begin to diminish. In the current market, we think around $1200 could be a good budget for a gaming PC. Sure, it would be lovely to splash $2000 on a brand-new gaming rig but for the vast majority of us, 1000- $1200 is a good starting place. At this price, you can have an excellent PC for gaming in 1080p, with some performance at 1440p too. 4K would be considered a bit of a stretch at this price point.
build a PC or go prebuilt – Is it worth building a PC for gaming?
So, you’ve worked out your budget and have a better idea of what you can afford. You also know what you want your PC to be capable of.
Now it’s a good idea to think about whether building your own PC is the best choice or if purchasing a pre-built gaming PC is a better fit for your budget. There are pros and cons for each, so let’s explore these in more detail below.
Self-built PC
There’s a great feeling of self-accomplishment that comes from building your own gaming PC. You’ll need to be fully dedicated to completing it, though. You’ll also need to know exactly what you need, where everything goes, and be fairly tech-savvy.
Of course, this article has all the information you need. But building a gaming PC is intricate work and you’ll have to practice some patience and dexterity to complete the job.
However, one thing that you’ll be able to do by building your own rig is customize it exactly the way you want. Pre-built PCs are a kind of ‘this is what you’re getting’ deal. By building your own, the sky’s the limit and you’ll be able to create something that caters to your gaming style and needs.
Prebuilt PC
We’ll start by saying that a pre-built gaming PC is definitely the best option for anybody that is relatively technophobic or unconfident with building their own PC. The slightest mistake could cost you time and money, so if you’re not 100% certain about what you’re doing, go for a pre-built PC.
Pre-built gaming PCs are ready to go straight out of the box too. So, while you won’t get that feeling of self-accomplishment, you will be able to get on with playing some games a lot sooner.
However, things are a lot less customizable with pre-built gaming PCs, and you’ll have to take what you can get. They are also a lot more expensive than building your own and, although they will come with technical support and will have been thoroughly tested, your budget will take a bit more of a beating.
Is it hard to build your own gaming PC?
No, the main concern for many newbie PC builders is compatibility issues and damaging parts. Compatibility can be sorted out with a small amount of research, there are tonnes of online help to ensure you get the correct parts for your new PC. In terms of damage, as long as you follow guides like ours and take your time, you have nothing to worry about.
What tools do you need to build a PC?

As you might imagine, building a gaming PC requires a number of components. While some of these are fairly obvious, there are others that you may never have even heard of before. This is especially true if you’re a complete novice to the inner workings of a PC.
So, what do you need to build a PC? Here, we’ll take you through each of the components you’ll need, as well as the tools and equipment required to put your gaming PC together correctly.
PC build checklist:
- Workstation (flat surface)
- Screwdriver (Phillips)
- Antistatic bracelet
- Thermal paste
- Isopropyl alcohol
- Paper towel/ lint-free cloth
- Cable snips + cable ties (optional)
Workstation
Start by allocating yourself a clean, clear workspace. This doesn’t have to be a drastic setup with a temperature-controlled environment or walls that are draped with plastic sheeting. Just somewhere that you’ll be able to work unrestricted and uninterrupted.
Make sure that your workspace has plenty of light so that you’ll be able to properly see the more intricate work you’ll be doing. Laying an anti-static mat down on your workspace before you begin assembling is also a good idea, as this will prevent any electrostatic discharges from damaging the more sensitive components of your PC.
Screwdriver
A screwdriver will be your most called-upon tool throughout the building process. However, it’s a good idea to keep a range of screwdrivers that differ in length, size, and head shape in your tool kit.
Trying to install any components with a screwdriver that doesn’t match the screw can result in your computer’s hardware not being attached securely enough. It can also damage the head of the screw itself, which will make removing hardware a much bigger job than it needs to be. If you don’t have a Phillips screwdriver lying around, we recommend the brilliant iFixit Pro Tech Toolkit. This has more than enough to get you started on your first PC build, including the required Phillips Bits and a handy anti-static strap.
Antistatic Bracelet
As well as making sure your gloves are anti-static, it’s a good idea to wear an anti-static bracelet during the build process too. This will prevent any electrostatic charges produced by the body from damaging sensitive hardware components.
Thermal Paste
This is a crucial item when it comes to installing your CPU and, along with your chosen fan, it will help prevent the processor from overheating and getting damaged. If your CPU has a cooler, this will likely already have been treated with a coating of thermal paste, in which case you won’t need to worry about adding any more.
What do you need to build a PC?
To build a PC you are going to need your components and a small number of tools. Firstly, when choosing the parts to build your PC, you will want to ensure all parts are compatible with each other (CPU, RAM, Motherboard), as the last thing you need to find is the CPU bottlenecking the rest of the system.
Long before the building process can begin you need to look at what parts you need to build a gaming PC. This is where things start to become a little more technical. However, learning what all of these components do within your gaming PC and what their acronyms stand for will make it building your PC seem a lot less daunting.
Below, we’ll go through each of them individually and give you a little more detail on what each of them does, while trying to keep things as jargon-free as possible.
Parts needed to build a gaming PC:
- Processor (CPU)
- Motherboard (MOBO)
- Graphic Card (GPU)
- Memory (RAM)
- Storage (SSD or HDD)
- Power Supply Unit (PSU)
- PC Case
PC Toolkit Note
If you don’t have a Phillips screwdriver lying around, we recommend the brilliant iFixit Pro Tech Toolkit. This has more than enough to get you started on your first PC build, including the required Phillips Bits and a handy anti-static strap.
Parts needed to build a gaming PC & where they go
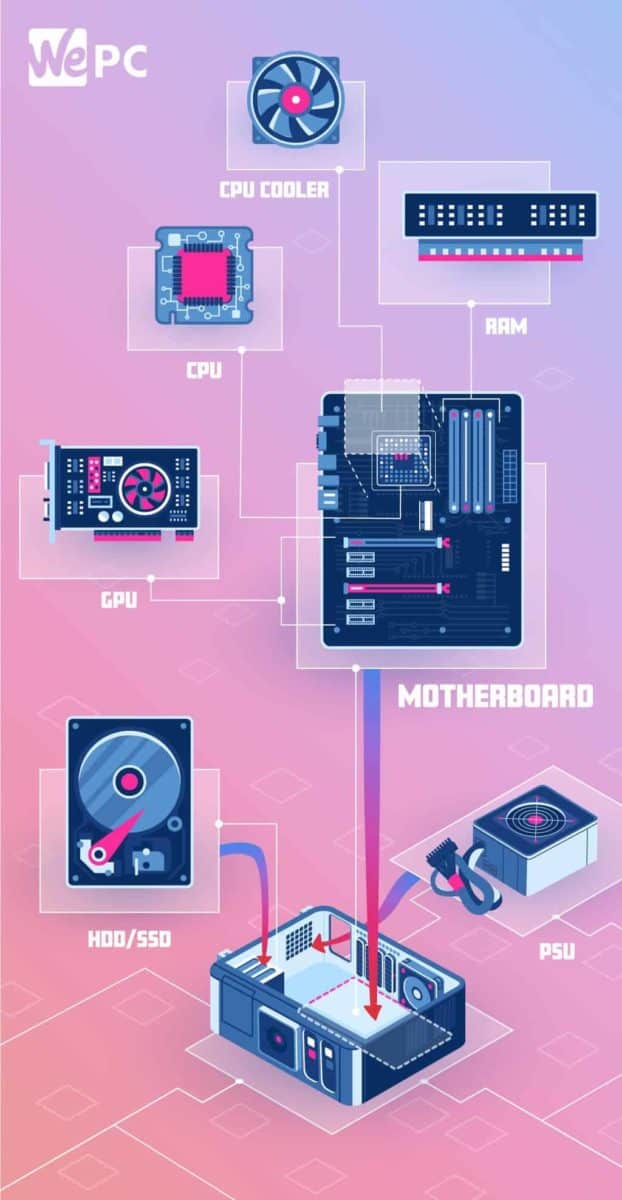
- CPU – The central processing unit executes instructions that make up a computer program. This is the core of your PC.
- GPU – The graphical processing unit renders images and is the most important component in a gaming PC.
- MOTHERBOARD – The MOBO provides connectivity between the hardware components of your computer.
- PSU – The power supply unit is the component responsible for powering your system. MOTHERBOARD – The MOBO provides connectivity between the hardware components of your computer.
- STORAGE – Your SSD/ HDD is responsible for storing your operating system, applications, games and media files.
- RAM – Random access memory is temporary data that the PC is actively using in the present.
- PC CASE – A computer case, also known as a computer chassis, tower, or enclosure, houses your entire build while simultaneously providing airflow.
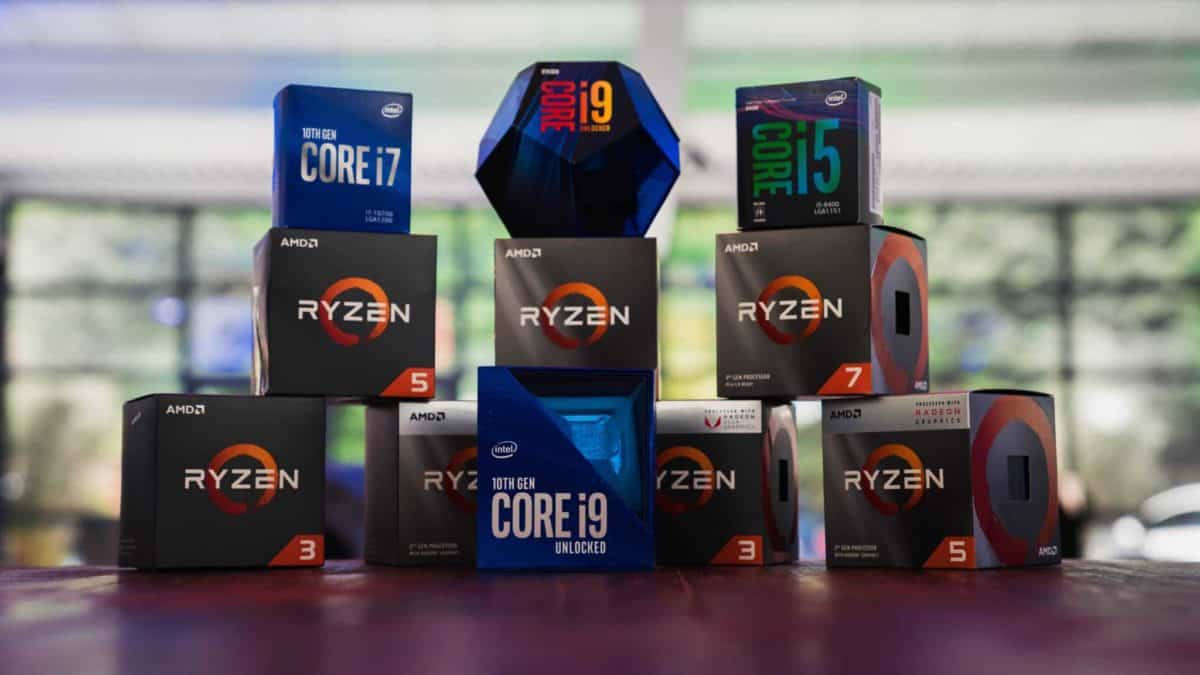
Processor (CPU)
The processor or central processing unit is essentially the “brain” of any computer. The CPU is considered the second most important component of a gaming PC, just after the graphics card, however, the most important for content creation. The processor executes instructions and is a crucial component in any PC.
The three most important things to know about a processor are its clock speed, cores, and threads.
Clock speed is a measure of processing speed, in gigahertz (GHz) and refers to how many cycles a core will perform every second. Every processor is made up of cores and threads, with cores usually being assigned to different tasks in your system. Furthermore, modern CPUs tend to have multiple cores, allowing them to efficiently perform multiple tasks at once. A CPU will also come with threads, which is essentially a virtual version of a CPU core. Threads can only perform one task at a time and correspond to cores, but if you see a processor with twice as many threads to cores, then it is what’s known as a “multi-threaded” CPU. A CPU with multiple threads allows two programs to run on a single CPU core at the same time, as long as it’s not the same type of instruction.
Clock speed and core counts are only really direct measures of performance with processors of the same generation, as underlying architectures that make up a CPU are ever-evolving and improving.
To ensure you get the best performance and to future-proof your setup, you’ll always want to buy the most up-to-date CPU your budget can afford.
Intel processors are widely known for strong single-core performance, which means they have always been regarded as the best gaming CPUs. While this is true, it isn’t a factor that should influence your decision when buying for gaming specifically as Intel’s CPU prices are heavily criticized for inflated pricing.
AMD processors are known for their strong multi-core performance and affordability, making them excellent for multitasking and heavy load tasks. With recent developments, AMD’s single-core performance has also improved making them a serious contender in the CPU market and closing the gap on Intel. The gap still exists though, with the statistics showing that the distribution of PC processors running the Steam platform as of January 2022 was at 69% in Intel’s favor.
For a better understanding of the current CPU market, it is worth a look at our CPU hierarchy article, to see how the different processors stack up against each other.
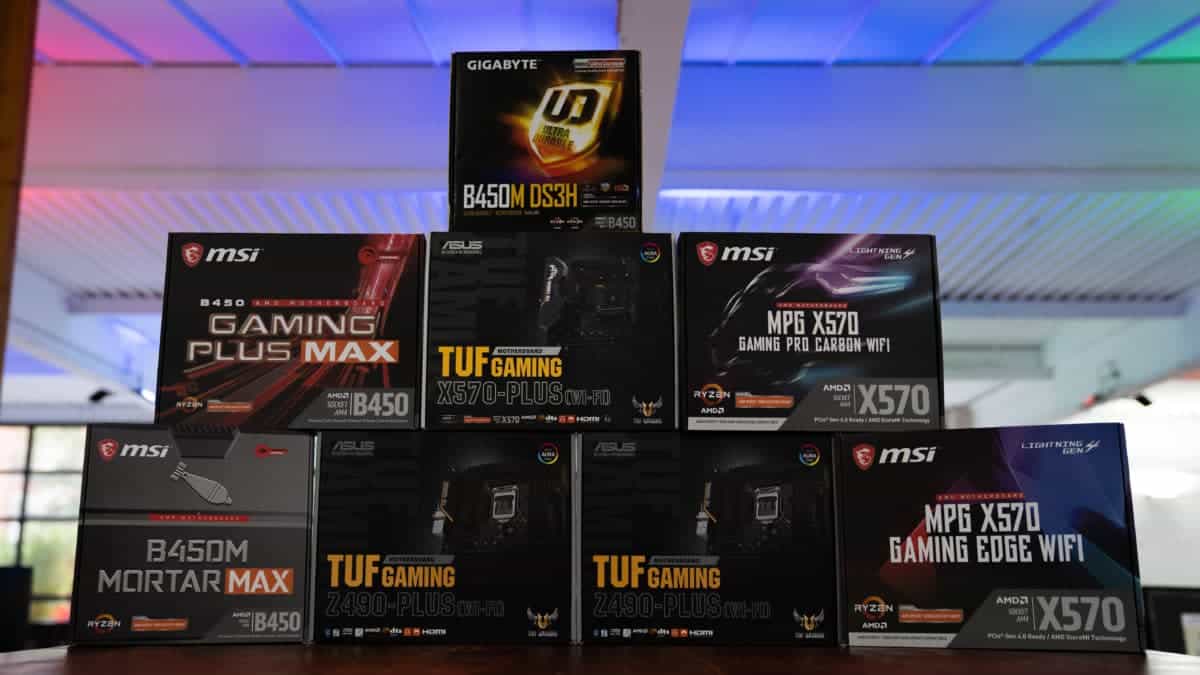
Motherboard (MOBO)
So, you’ve decided on a processor. Now, you need a compatible motherboard. When looking at motherboards, the main difference between the low and high-end boards is usually overclocking abilities and premium features.
So, you’ve decided on a processor. Now, you need a compatible motherboard. When looking at motherboards, the main difference between the low and high-end boards is usually overclocking abilities and premium features.
If you plan on overclocking your CPU:
- With Intel CPUs, you’ll need a K-series processor and a Z-series motherboard
- With AMD CPUs, all their processors are overclockable but you will need a B- or X-series motherboard
Once you have decided if you are going to be overclocking your new PC build or not, it’s time to decide what form factor your MOBO and case is going to be. The common motherboard sizes for a gaming PC are generally: ATX, MATX, or ITX.
Things like USB ports tend not to change between sizes, but the smaller you go (ITX being the smallest, ATX the biggest), the less RAM and PCIe slots you are going to have. Keep in mind that Mini-ITX size motherboards tend to be more expensive, so if you are on a specific budget you should be aiming for ATX or MATX sizes, which most mid-tower cases will fit.
The motherboard doesn’t need to be fancy, it just needs to be reliable, so buying from a reputable manufacturer is important. ASUS, ASRock, Gigabyte, and MSI are our recommended choices. Once upon a time, Intel was designing and building motherboards, with a 40% market share of the overall market in 1995. ASUS soon knocked them off the top spot in the 21st century as the leading supplier.
Graphics Card (GPU)
The graphics processing unit, or GPU, is the most important component in any gaming PC and it is usually the most expensive component on any build list.
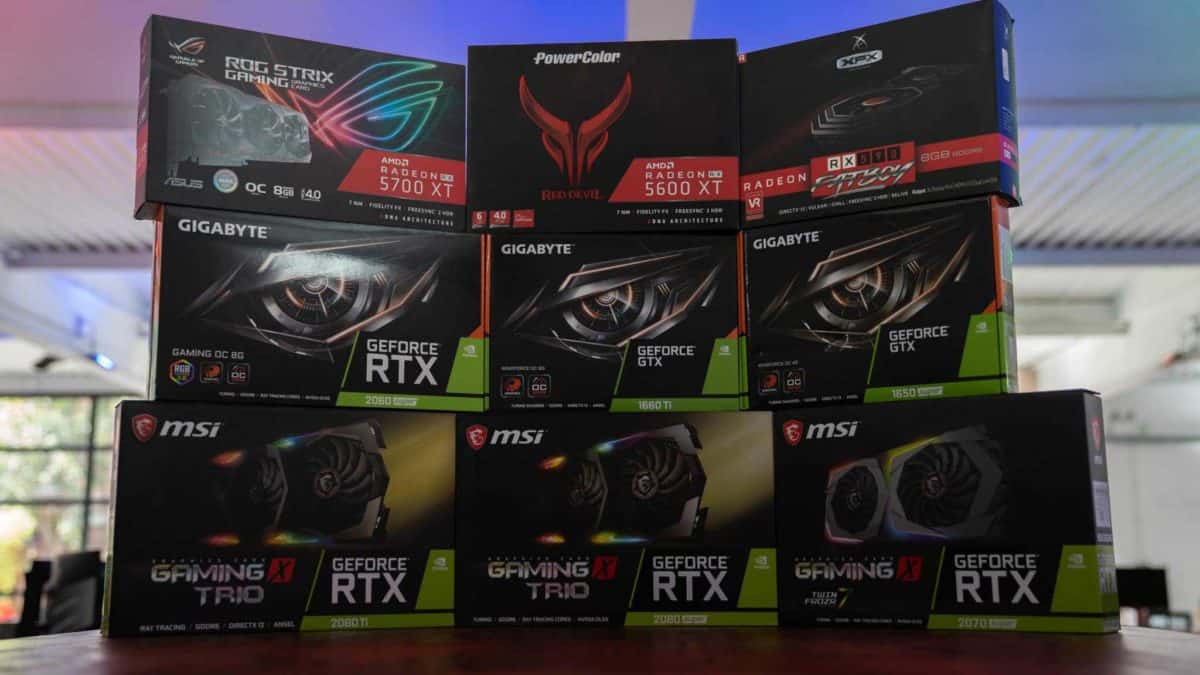
To better understand how a GPU works, imagine you are playing a multiplayer shooter. During the game, the CPU is responsible for tracking the physics, such as players, objects, and where they are on the map. The GPU however, takes this information and renders the graphics that you are seeing, at the resolution and settings you have set it to.
The GPU is without a doubt the most important component in a gaming computer, however, it still needs the CPU to function. If the CPU isn’t processing what’s happening in-game fast enough, your GPU’s visual output will be bottlenecked, since it has to wait for the CPU to catch up.
A GPU is comprised of different components to perform rapid calculations, that result in a rendered image. Let’s go over a few terms you may see on the specifications of a graphics card.
Clock Speed, along with a few other components to a GPU, determines the ability of a GPU in its processing and gaming tasks. We only recommend using clock speed as a performance metric between the same model card from different manufacturers.
VRAM is a more useful measurement but it is important to know that VRAM varies from card to card. GDDR5 was the old standard and still features in a lot of entry-level/ budget GPUs. Don’t grab a GPU any lower than this. GDDR6 is the new standard and features on the latest AMD and Nvidia cards.
- At 4GB of VRAM, expect decent performance in 1080p resolution with standard-definition textures
- At 6GB of VRAM, expect decent performance in 1440p, or 1080p resolutions with high-definition textures
- At 8GB+ of VRAM, expect good performance in VR titles, 4K, and 1440p resolutions with high-definition textures.
We have already made our best GPU recommendations for gaming but for a better understanding of how a certain card performs, it is worth checking out benchmark results. We have a wide selection of benchmarks tests on our YouTube channel but if you are ever struggling, simply google “ [card you would like] benchmark results ”. As there are quite a few GPU models on the market, it may be worth checking out our GPU hierarchy article so you can see what is available and the differences.
Nvidia and AMD are the two providers of the GPU, with the pair controlling almost 100% of the market share as of 2018. Nvidia and AMD controller 66% and 33% respectively.
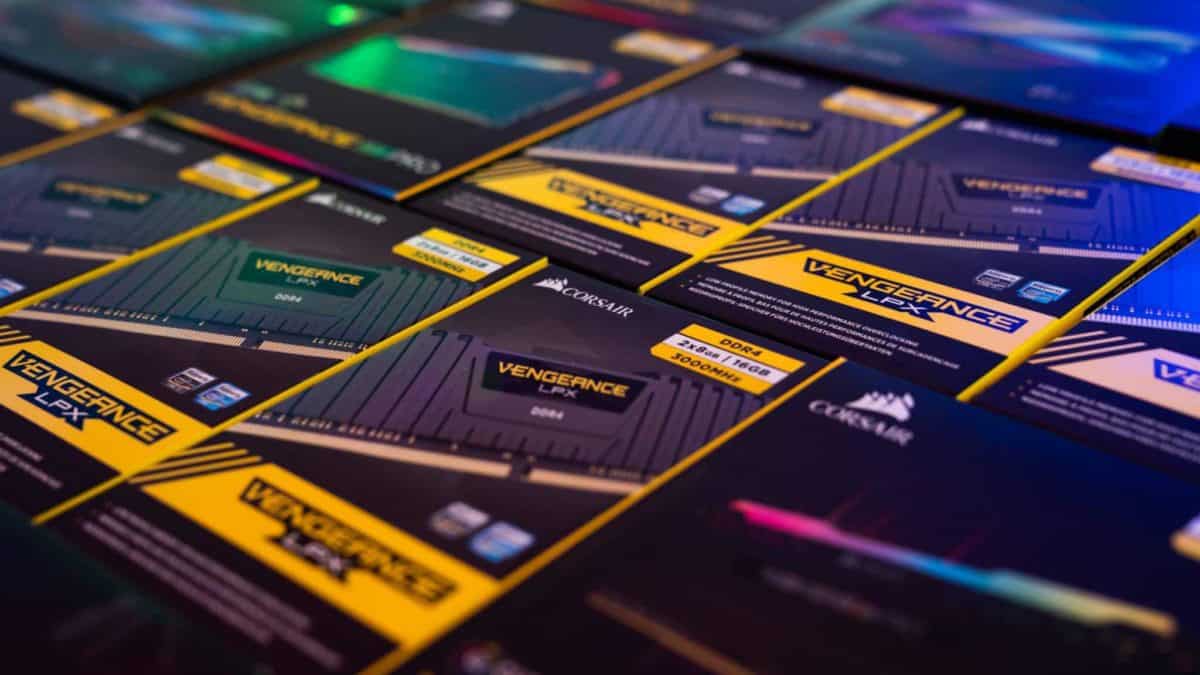
Memory (RAM)
Random access memory, commonly known as RAM or memory, is considered the third most important component for gaming performance. RAM is essentially your PC’s short term memory, it’s fast and easy to access but it is temporary. This is where your PC stores data that is actively being used. Through benchmarking, it has been shown that having adequate amounts of speedy RAM can improve your CPU performance, and the flip side is, if you have more than you need, you are actually wasting money.
While you can go for single-channel memory in your new PC build, it is important to know that you should always aim for dual. Dual-channel memory can positively impact your gaming performance and if one of the memory sticks stops working, you can still use your computer.
You may see terms such as DDR when looking for RAM; make sure you buy the latest standard, which is DDR4.
While the speed or frequency of RAM isn’t the most important factor, it has been shown that AMD’s latest processors benefit from fast-acting memory. In all of our AMD builds here at WePC we try and make sure they feature speeds of 3600MHz, giving you greater gaming performance from your build.
As a side note, when you buy RAM it will most likely be running at its stock speed (2133MHz). RAM running at stock speed is no issue and the chances are you won’t notice much of a difference. That being said, changing your RAM speed to its full potential is quite simple these days, so it is worth doing. Firstly, ensure your motherboard can run the RAM at the advertised speeds, and then you can overclock it in the system BIOS.
Speed can help you grab some extra FPS in certain circumstances but it is RAM capacity that is the most important factor to consider. Generally speaking, the more RAM you have, the better the system will be at running multiple applications and handling modern game titles.
- 4GB – This is the bare minimum amount of RAM. 4GB would only be suitable for basic computing tasks and really light gaming, as modern games would be overwhelming
- 8GB – A gaming PC with 8GB of memory these days would be considered budget. While this works fine for just gaming, multi-tasking may be a bit of a stretch. For example; if you are playing a very intensive modern game and wish to tab out, higher capacity RAM makes this a smoother experience
- 16GB – At the moment, this amount of RAM would be perfect. For some, this could be overkill but having 16GB of RAM in your system will improve your overall experience and future proof your PC too
- 32GB – This is more than you need for gaming and while it would be nice to have, the cost wouldn’t be worth it unless you planned on doing video editing work/ content creation
When purchasing RAM, you can reference our best RAM guide to make sure you get the best possible kit for the job.
Storage (SSD/HDD)
We used to store everything from applications and word files to games on our HDDs but since the introduction of SSD technology, this all changed. An SSD, or solid-state drive, is a storage device with no moving parts and the information is stored in microchips, making an SSD much faster.
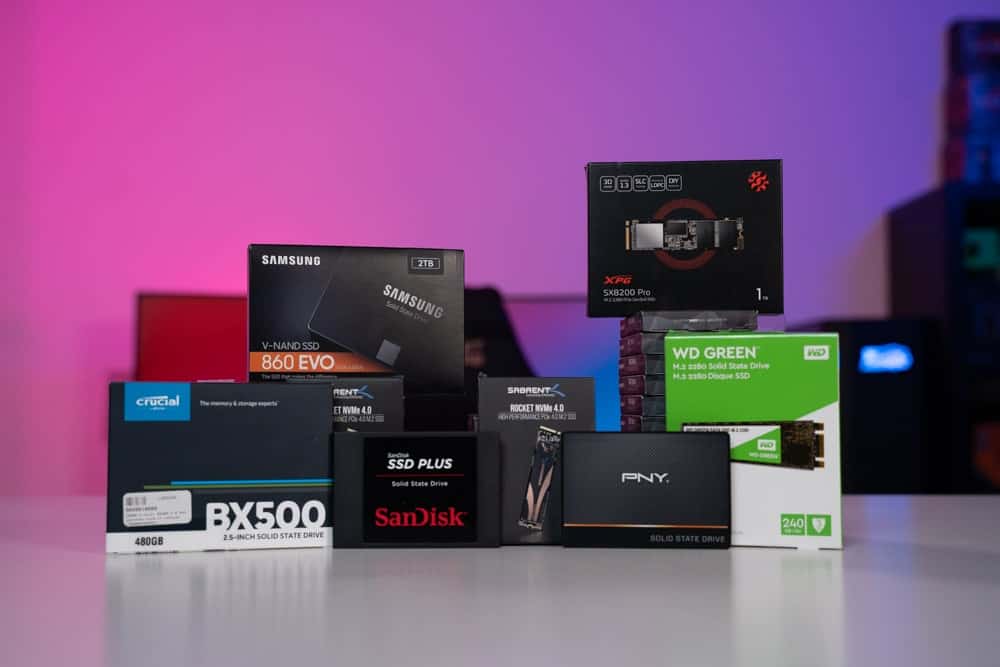
For top-quality storage, get an SSD. It’s faster, more durable, and generally smaller. That being said, it is much more expensive than an HDD. HDDs offer more storage space for less, however, the quality isn’t quite as good as an SSD.
An ideal scenario would be a combined storage solution of both an SSD and HDD – if you can afford this in your budget. Grabbing an SSD big enough to store your operating system, favorite multiplayer games, and applications will result in a much more pleasant experience. Your boot up and load times will be much faster, you may get a boost in certain games, and you can even use your SSD as a cache.
Meanwhile, an HDD can be used for storing your media files (music, film) and your single-player games, where loading times are not that important.
To help you find the best storage devices for your build we have created separate guides: one highlighting the best hard drives and the other helping you find the best SSD.
Power Supply Unit (PSU)
The power supply, or as it’s commonly known, the PSU, is as straightforward as it sounds and provides power to your whole system. When buying a PSU for your PC build there are a few rules to follow.
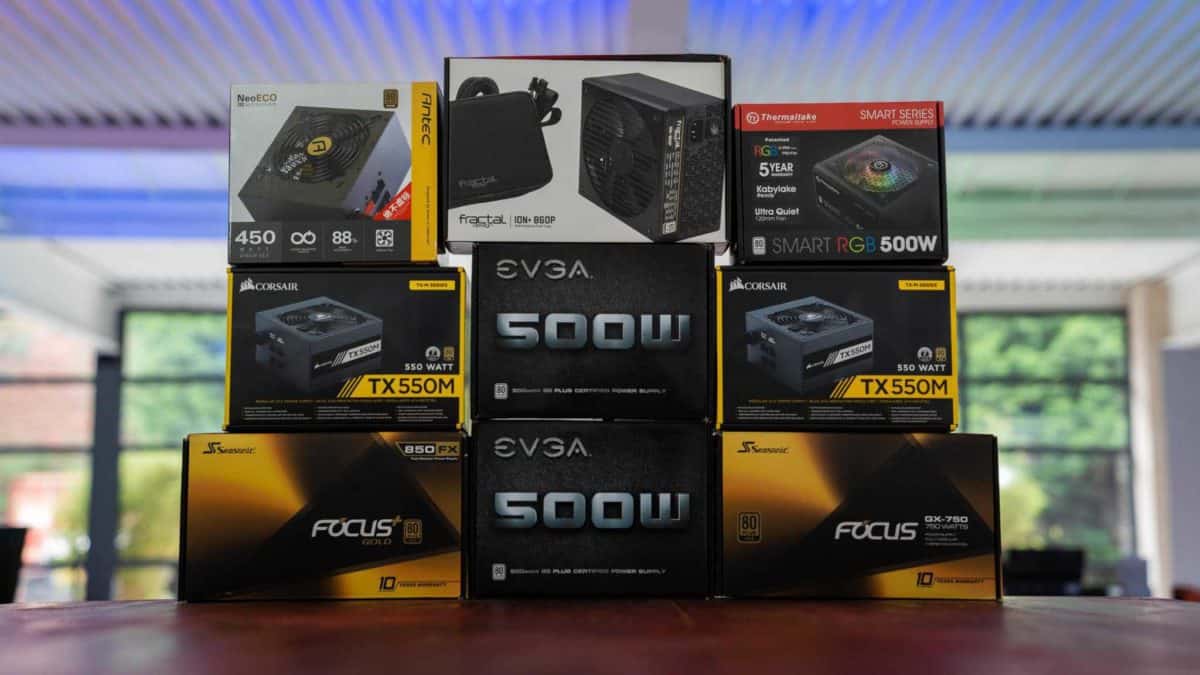
Firstly, make sure you go with a reputable manufacturer. Off-brand manufacturers will often sell poor quality PSUs, sure they may come at a great price but it isn’t worth putting the rest of your system at risk. Stick with trustworthy brands such as; Corsair, EVGA, and SeaSonic. Next, you are going to want to ensure you have enough wattage for your system. You can use tools such as a PSU calculator to determine what PSU to go for.
Keep in mind, PSU requirements listed on a GPU’s specs will usually be inflated, but you may want to opt for these if you plan to overclock or expand your system in the future. A highly efficient PSU may not save you massive amounts of money but now all reputable manufacturers use 80+ efficiency ratings. The higher the rating, the higher the cost but this means the PSU will utilize most of the power it creates and less heat will be exhausted.
It is worth pointing out that the energy efficiency of a power supply drops significantly at low loads. This means it is important to match the capacity of a PSU to the needs of your build, with efficiency generally peaking at about 50-75% load. Do not buy a PSU without an 80+ certification. Finding the best PSU for your needs may sound tricky but with our best PSU guide, you can be sure to get a reliable power supply unit.
PC Case
Whether you choose your PC case or motherboard first is up to you, but make sure the form factor is compatible as we discussed earlier (ATX, MATX, or ITX).
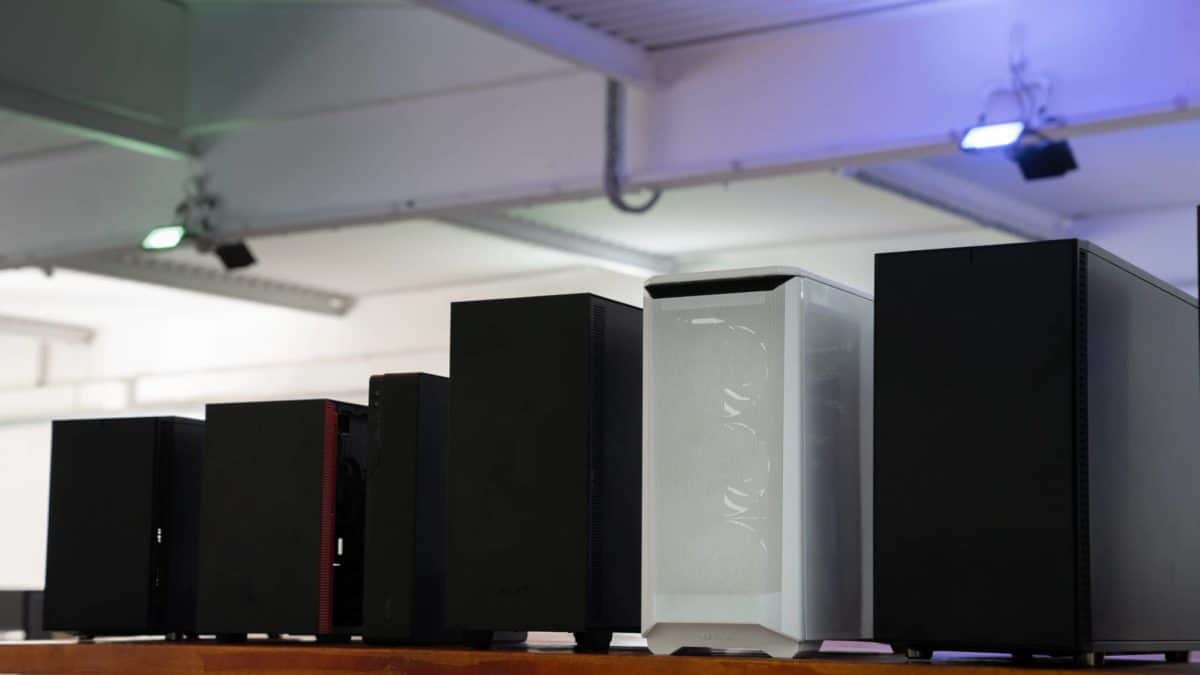
All of the components you’ll be putting together and installing need somewhere to live that will keep them well protected. This is where your PC’s case comes into play. This isn’t a simple task though, and a little thought will need to go into making the best choice for your individual needs.
Let’s look at sizing first. The size you choose will determine the size of the components you can fit inside it which, in turn, plays a role in the performance of your gaming PC. It will also determine how many fans you can install to keep everything running smoothly and prevent overheating. You’ll want to check and make sure your case of choice has room to fit the GPU in (ATX and MATX cases will generally fit the biggest of cards in). If you wish to build a compact system in a Mini-ITX case, then you could run into issues when installing a full-sized graphics card.
You’ll need to think about your computer case’s expansion possibilities too. A full tower case will give you the opportunity to upgrade and add new components whenever you choose. Smaller cases may need to be replaced entirely as you evolve and replace your gaming PC’s components.
Aesthetics are important too. The case of your PC is going to be on show in the room you place it in, so it might be a good idea to make sure it fits in with the rest of your interior design scheme. Whether you choose your case or motherboard first is up to you, but make sure the form factor is compatible as we discussed earlier (ATX, MATX, or ITX).
CPU coolers and radiators can also have clearance issues in cases, so be sure to check this when buying. Furthermore, if you are looking to boost airflow with fans, check to see if the case comes with any, or how many mounting options there are if you need to buy some.
Once compatibility is out of the way, the case you choose is down to design and build quality. Always check reviews for cases as you will often be able to read about experiences building in that particular case and if it was easy or hard.
If you are looking for a new PC case, we have created a guide that covers the best PC cases, with many being mid-tower options. If you are new to building, we recommend going for a mid-tower case as they are the most common and are generally the easiest to build in. For those looking to create a more extreme build, you may want to check out our roundup of the best full-tower cases or our best mini-ITX cases guide for the more compact PC build.
PC case fans
Most PC cases by default will come with at least one pre-installed fan but you should always check. The underlying rule is to only add fans if you need them, so if you are running a high-end system, you are likely to need more fans than a low-end system. It is always a good idea to have two fans minimum, with one at the front sucking cool air into the case and one at the rear pulling the hot air out of the case.
There are three main things you’ll need to consider when you’re looking at case fans; Airflow, RGB Lighting, and Noise Output. Here’s a simplified explanation of each:
- Airflow: This is your fan’s primary function and is the main cooling component, so it’s definitely the most important of the three. A fan’s airflow is measured in “CFM” (cubic feet per minute) and the higher this number is the more efficient it will be at keeping your CPU cool.
- RGB Lighting: This doesn’t really have much of an impact on your fan’s cooling abilities, but it does add a stylish lighting effect to your PC case. There are likely to be extra cables to deal with here though, so it’s worth thinking about whether you really need RGB lighting.
- Noise Output: Ideally, you want your fan to be as quiet as possible without sacrificing any cooling performance. If your fan is too loud, it could affect your gameplay experience.
Choosing peripherals and OS
Once you’ve sorted out your hardware, you’ll need to think about what software you need for your gaming PC. This will be the operating system that brings power to your hardware and, ultimately, gives you the ability to play the games you built your PC for.
Operating system (OS)
There are three main operating systems available to choose from. Although personal preference and past experience will play a large role in determining which one you choose, it’s a good idea to research each of them before settling on your final decision.
Windows
This operating system is arguably the most famous, and certainly the most popular when it comes to gaming PCs. Windows 10, for example, was the most popular desktop operating system, accounting for more than 80% of the market share as of December 2021.
One of the reasons for its popularity is the extremely user-friendly interface. Windows is easy to install, easy to navigate, and even easier to pick up quickly. Everything is pretty much laid out for you to find as quickly as you need to. It also has increased FPS figures so you’re almost guaranteed top-quality graphics in line with your chosen GPU.
The best Windows software you’ll find to date for a gaming PC is Windows 11. Not only does it have a built-in store that gives you access to thousands of games, but it also comes with an Xbox app that lets you chat from PC to PC, or PC to console with other players from all over the world.
Mouse and keyboard
A mouse and keyboard are crucial for your computer and if you don’t already own them, you are going to want to get these
A gaming mouse and keyboard are crucial for your computer and if you don’t already own them, you are going to want to get these items. Regardless of what games you play, a mouse and keyboard are going to be the next step to a perfect gaming experience. Here at WePC, we have already tested hundreds of mice and keyboards to find the very best, so be sure to check those guides out.
Gaming monitor
What monitor you choose for your new PC isn’t massively important but there are a few guidelines to ensure you don’t waste money. An example of waste would be: buying a 4K, 144Hz monitor for a budget $600 system, it would be pointless. When buying a monitor, remember that some monitor’s advertising 99% sRGB, claiming the screen covers 99% of the sRGB color gamut, is largely considered indistinguishable from 100% when viewed with the naked eye.
- For PC builds $500 and under, go for a 1080p/60Hz monitor.
- For PC builds between $600 and $800, go for a 1080p/144Hz or 1440p/60Hz monitor.
- For PC builds between $1000 and $1500, go for a 1080p/144Hz/240Hz or 1440p/144Hz monitor.
- For PC builds $2000 and up, go for a 1440p/144Hz/240Hz or 4K/60Hz monitor.
Take a look at the best monitors for gaming in our in-depth guide, or if your budget is large enough you may want to check out the best 240Hz gaming monitors or our best 4K gaming monitor roundup.
Remember: Not all gaming monitors come with speakers, so you might want to grab yourself a gaming headset.
How to build a gaming PC – step by step assembly
Before you begin, make sure you’ve organized your workspace as described earlier. This will make it easier to find everything you need exactly when you need it. Once you’ve done that, wash and dry your hands as it is time to install all your components and create your new PC build. You are going to need to set aside approximately 1-2 hours to complete the PC build.
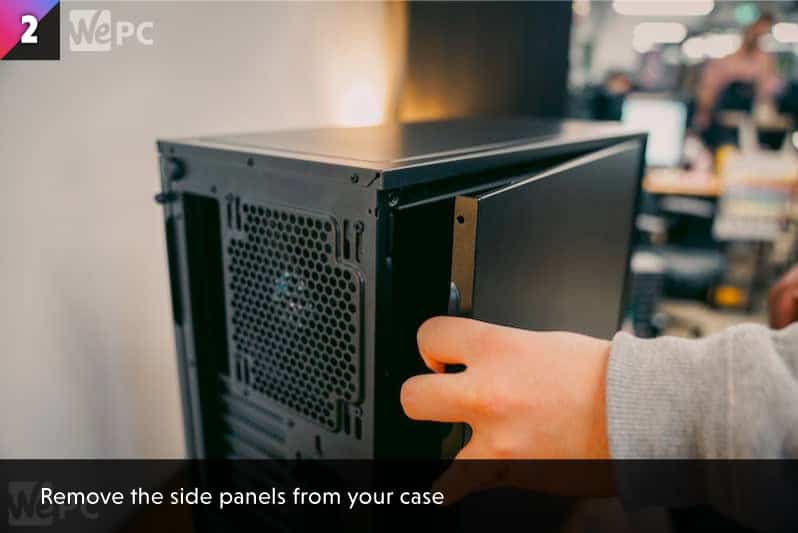
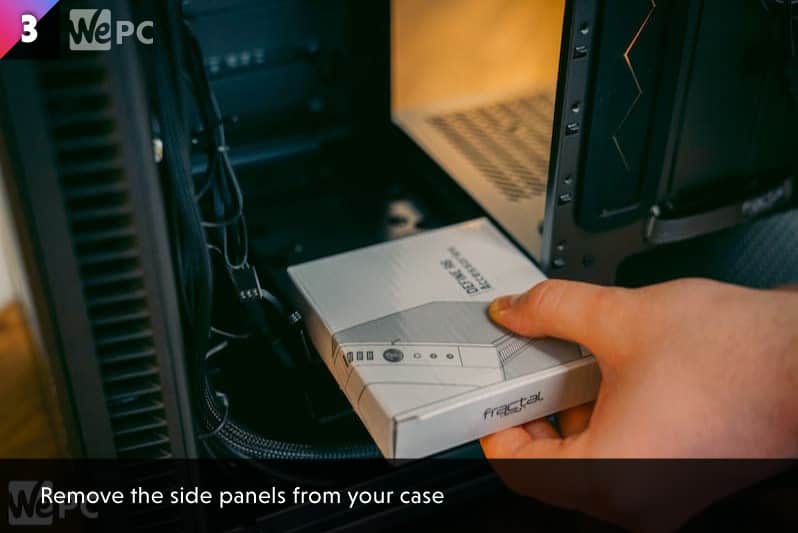
Step 1.1: Prepare The Case
Parts and tools required: Case, Case manual, Screwdriver
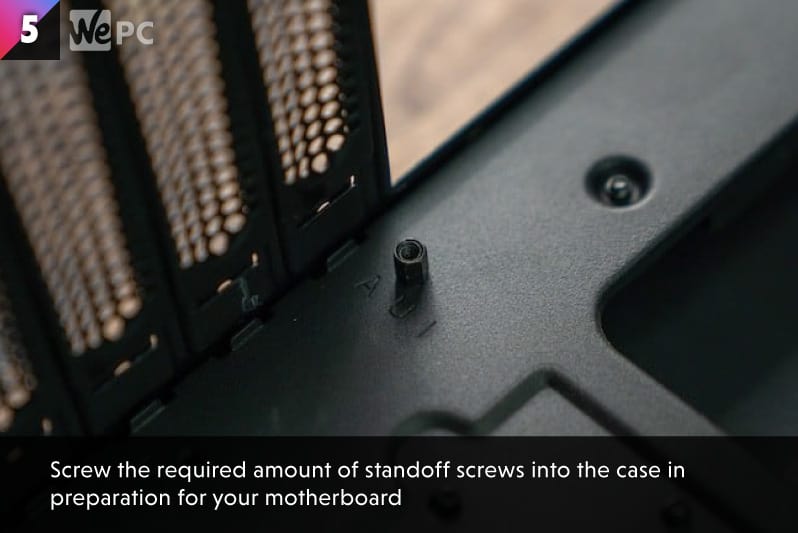
Once the case is out of the box, remove the side panels to reveal the internal frame of the case, and be sure to remove all packaging. Inside, you will notice a small box or bag of screws, these are going to be needed for the installation process later, so set them aside.
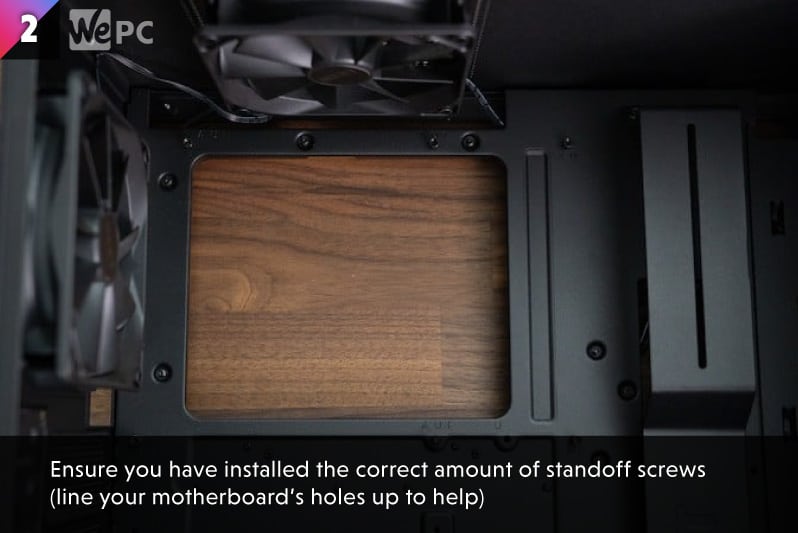
Untie your cables out the back of the case so they are loose and ready to go once the motherboard is installed. Finally, screw in the correct amount of standoff screws you need, depending on the form factor of your motherboard.
Now set the PC case to one side.


✓
Tip
Sometimes the back panel thumbscrews can be a little tight, so just use a screwdriver and save the skin on your thumb.
Step 1.2: Install Fans
Parts and tools required: Case, Case manual, Screwdriver
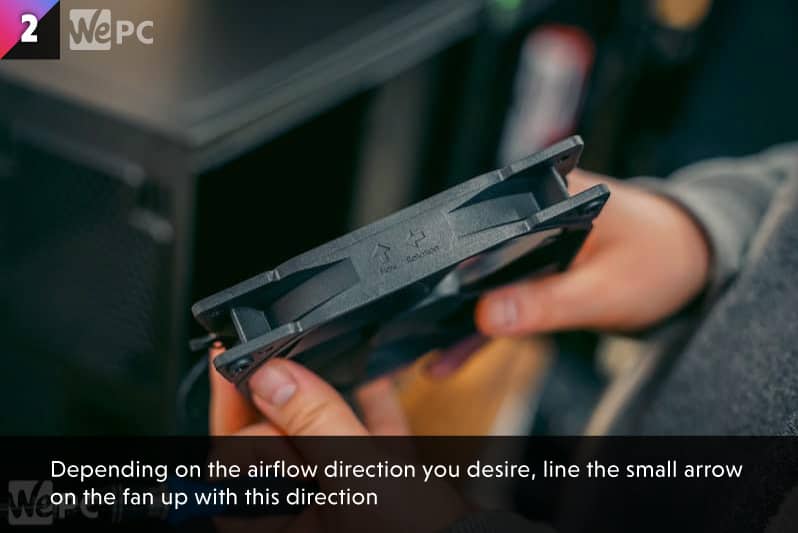
If you are replacing case fans with some alternative options, first remove the fans from your case. To get to the fans at the front of your case you may need to take the front panel off. Removing the front panel can be quite tricky and it can often require a fair amount of force.
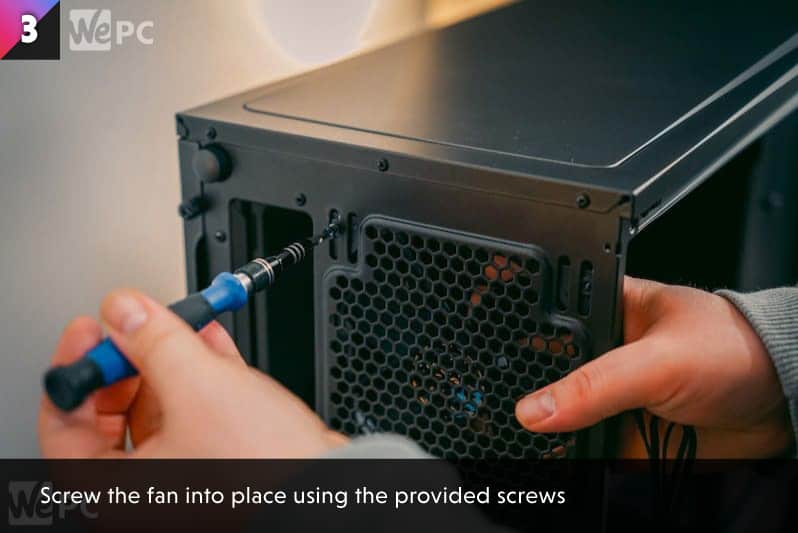
On the fan you are installing you will notice a small arrow to show what direction the flow of air will travel. Line up the arrow depending on if you are going for a push/ pull configuration and secure in place with the screws that will come with the fan.
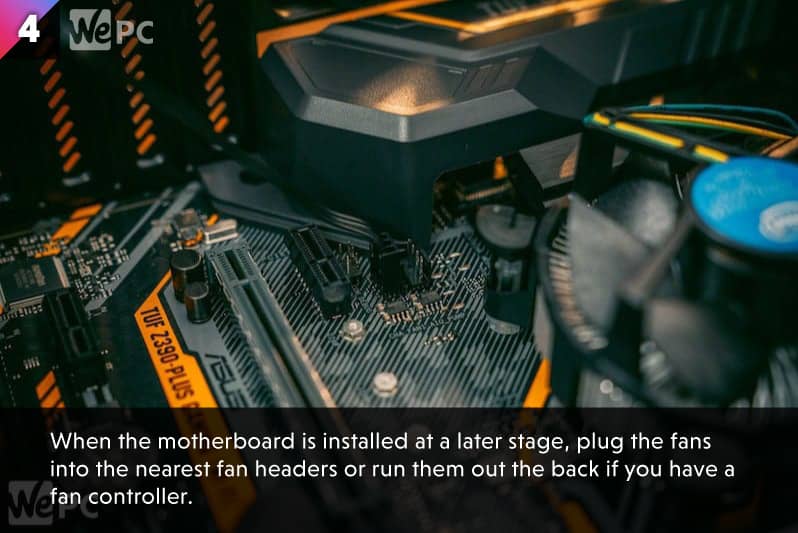
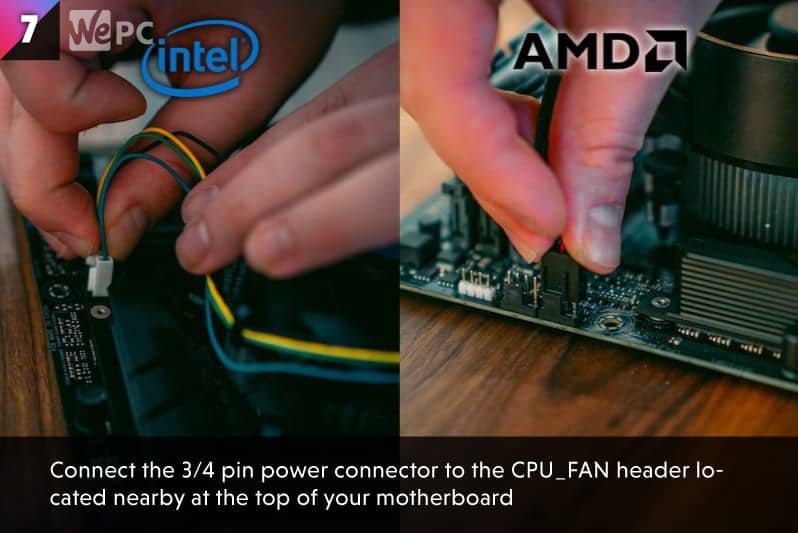
When it comes to wiring the fans, the rear fan will have a fan header near it on the motherboard. Motherboards generally have 3-5 fan headers dotted around, so consult your manual if you are having trouble finding these.

✓
Tip
Orient the fan so you can hide the cable in a more efficient way.rnrn
✓
Tip
Run the fan cables out the back when you can to help tidy up the inside of your build.
✓
Tip
A common setup would be two-fans at the front and one-fan at the back.
Step 2: Install The Processor (CPU)
Parts and tools required: CPU, Motherboard
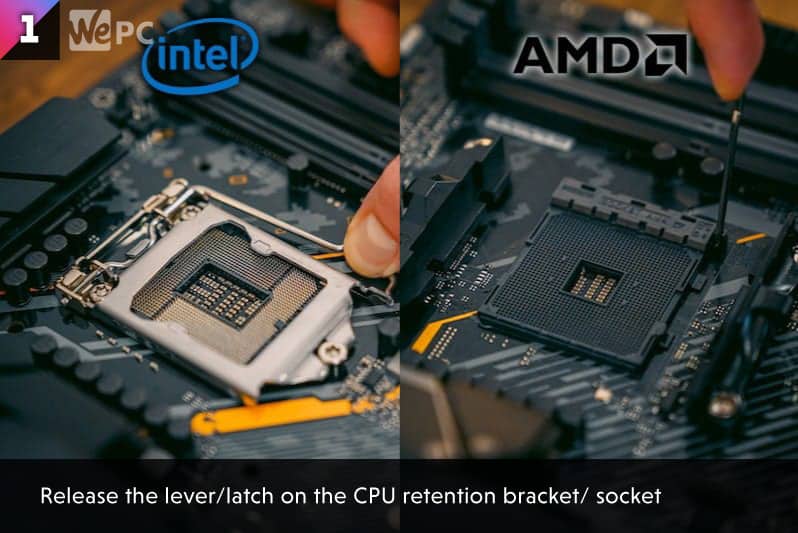
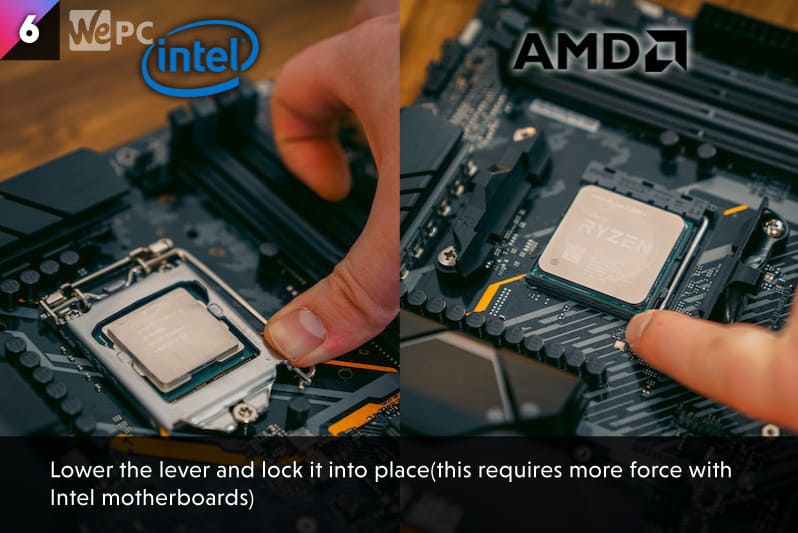
Remove the motherboard from its packaging and place it in your workspace. Find the CPU socket (usually near the top-middle of the board) and release the lever until it is upright. When the lever on both AMD and Intel boards is upright, it is ready to take the CPU.
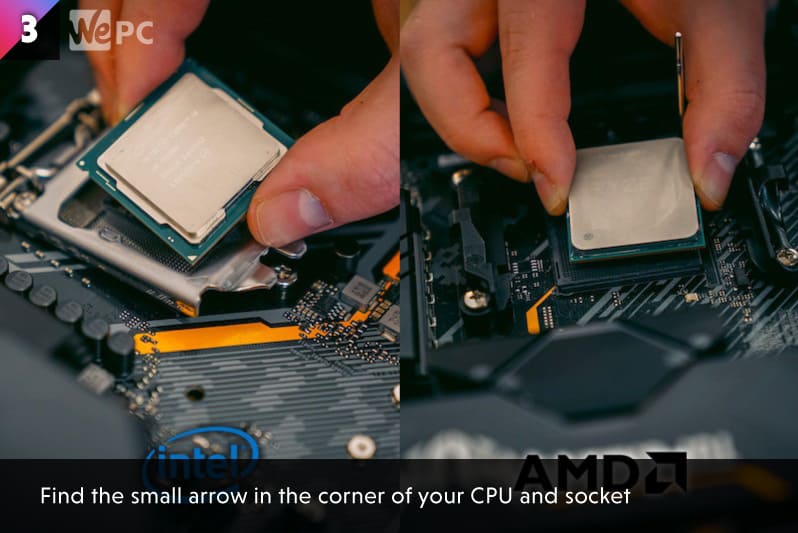
You will notice on your AMD or Intel CPU and motherboard a little arrow in the corner. This arrow indicates the position of your CPU and you should line up these arrows.
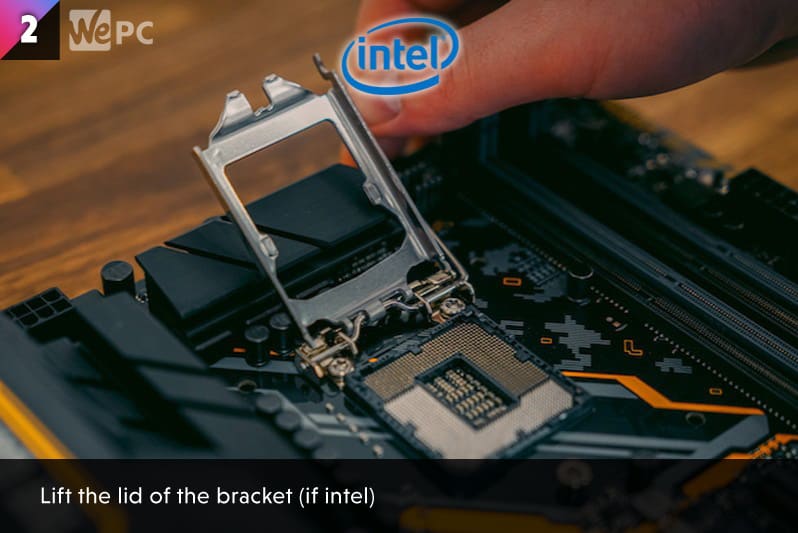
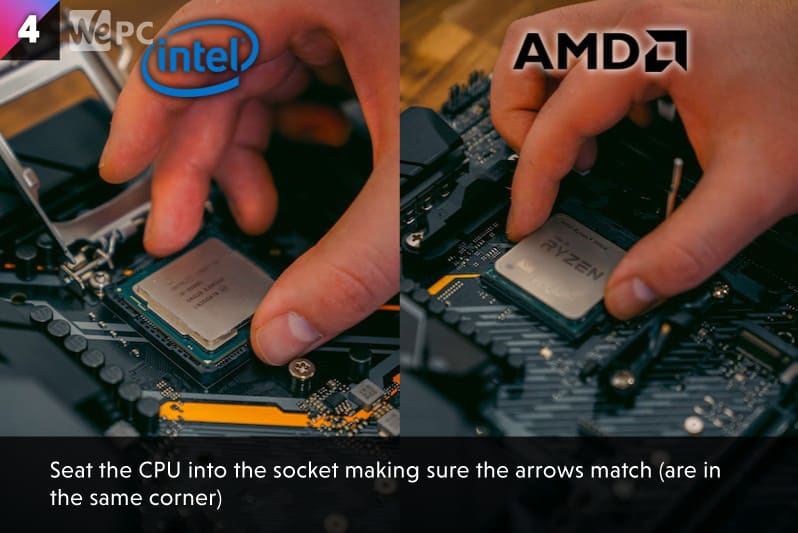
Place the CPU into the socket and give it a gentle nudge if it doesn’t fall into place. Make sure the CPU is flush before lowering the lever down. With Intel-compatible motherboards, there will be a protective bit of plastic over the socket and metal clasp, clip this back under the bolt. The lever will feel like it has a lot of tension in it, don’t worry this is normal and the plastic shield will pop off during installation.
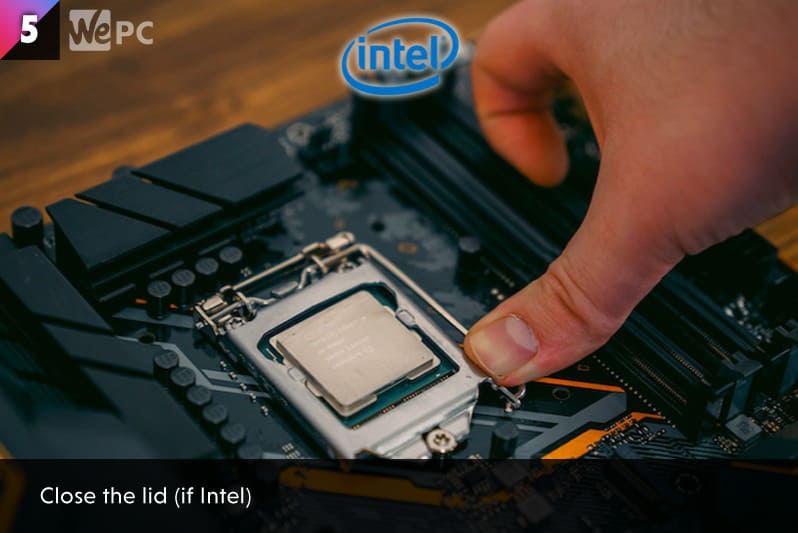
✓
Tip
When handling the CPU, be sure to hold it from the sides and avoid touching the top or bottom and remember, the CPU only fits into the socket one way.
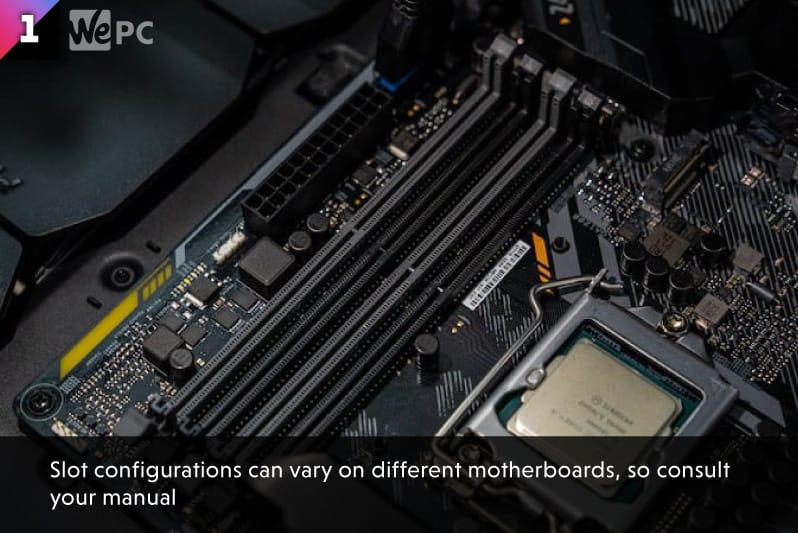
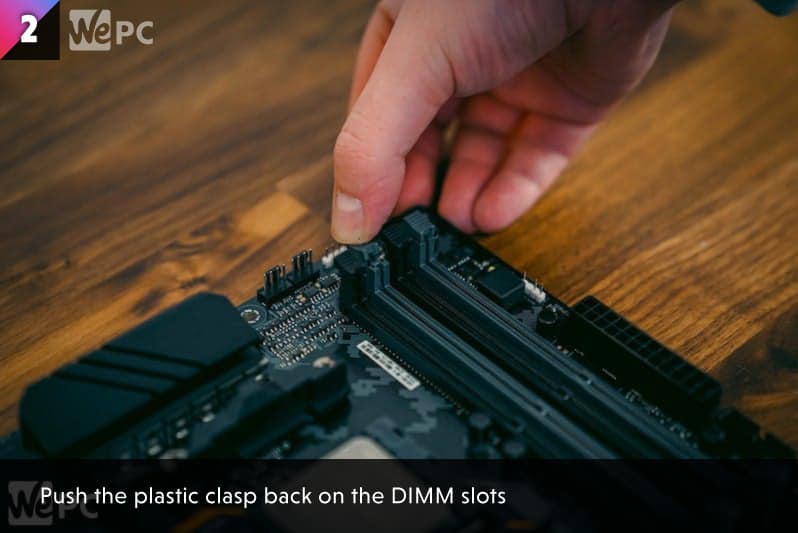
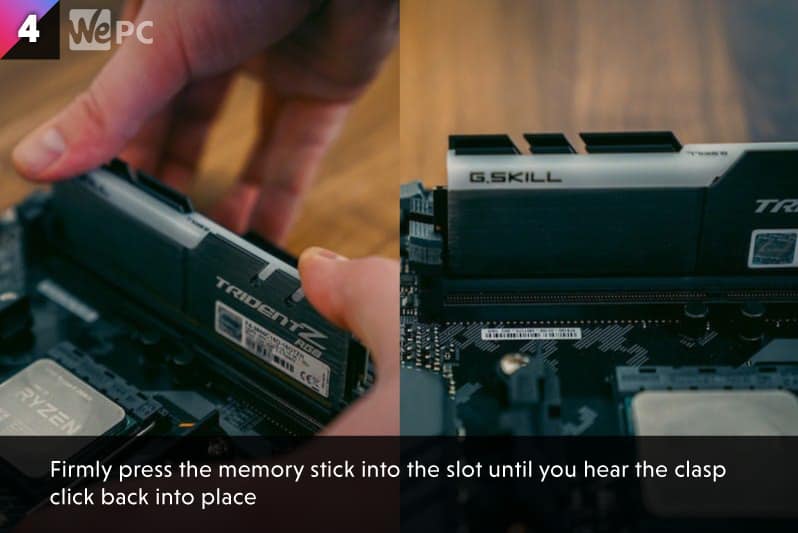
Step 3: Install The Memory (RAM)
Parts and tools required: RAM, Motherboard, Motherboard user manual
If you are going to fill up the available RAM slots on your motherboard, line up the memory stick (only goes in one way) and push until you hear the click. You may need to snap back the plastic bits at the end of each slot before doing this. If you aren’t going to use up all those RAM slots (very common) then be sure to check your motherboard’s user manual which will let you know which slots your RAM goes into.

✓
Tip
At the end of the build, if you experience no display, it can often be down to the RAM not being seated properly. Turn your system off and double-check that the RAM has clicked into place
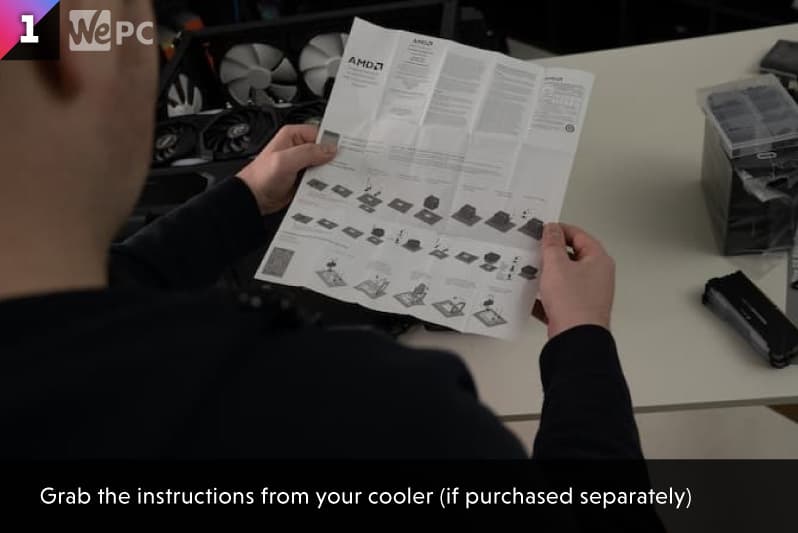
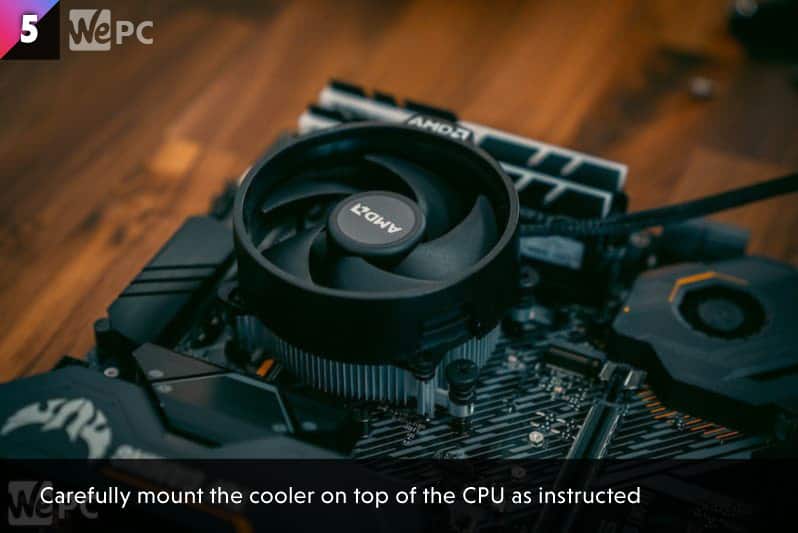
Step 4: Install the CPU Cooler
Parts and tools required: Motherboard with CPU installed, Cooler, CPU user manual
Whether you’ve grabbed an AIO liquid cooler or an air cooler, they all can feature different brackets and installation processes. Get the cooler manual out to make this next step much easier.
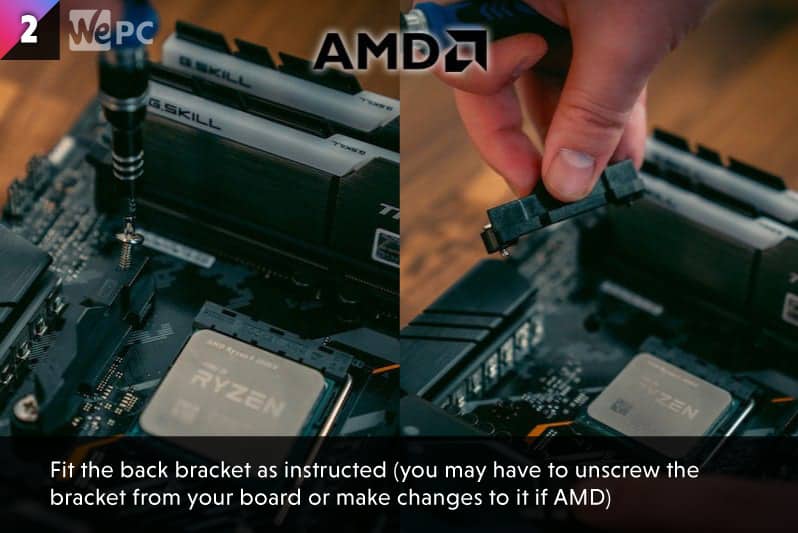
Some coolers require a mounting bracket which normally slots in from the back of the motherboard. Some motherboards come with the backplate pre-installed but for the most part, you are going to have to attach this.
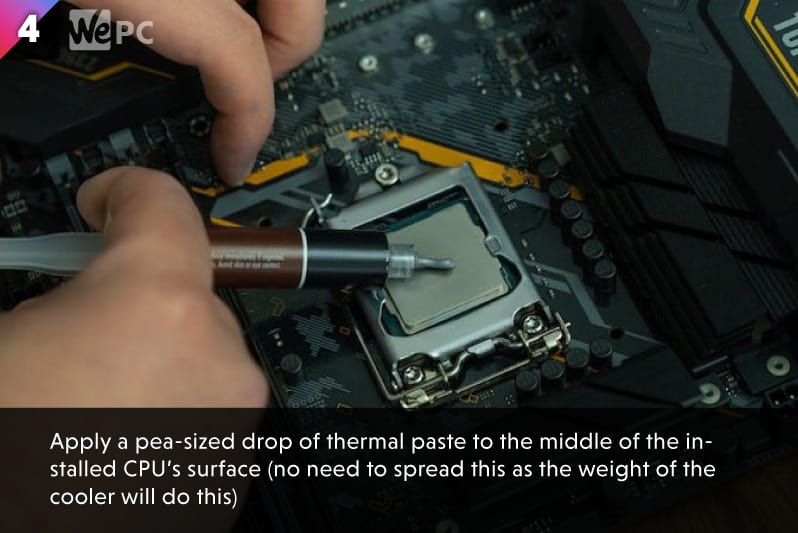
Once the bracket is attached/ replaced and the other small parts to attach the cooler is ready to go, check to see if the base of the cooler has thermal paste pre-applied (thin grey layer of paste). Thermal paste is very important so if you cannot see this on the base of your cooler, you are going to have to apply some of your own. To apply thermal paste, you can check out our easy to follow, step-by-step guide.
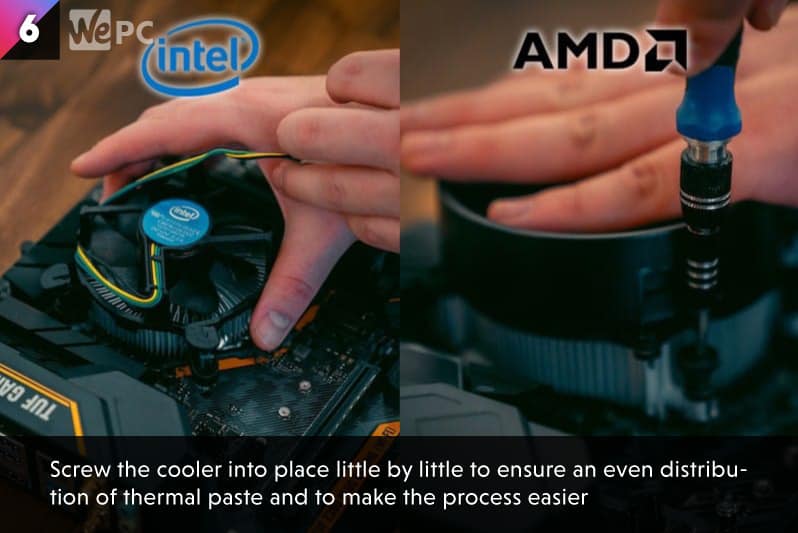
Assuming you have thermal paste applied, go ahead and place your cooler onto the top of the CPU, lining up the screw holes. AMD and Intel stock coolers are some of the simplest to install but if you are using an aftermarket cooler, be sure to tighten the screws in a criss-cross pattern.

✓
Tip
To remove the thermal paste, use a lint-free cloth and a small amount of rubbing alcohol (90% isopropyl)
✓
Tip
If installing an AIO liquid cooler, just install the bracket and wait till your motherboard is in the case before installing the radiator.
Step 5: Install The Motherboard (MOBO)
Parts and tools required: Motherboard, Case, I/O shield (if not attached to MOBO), Screwdriver
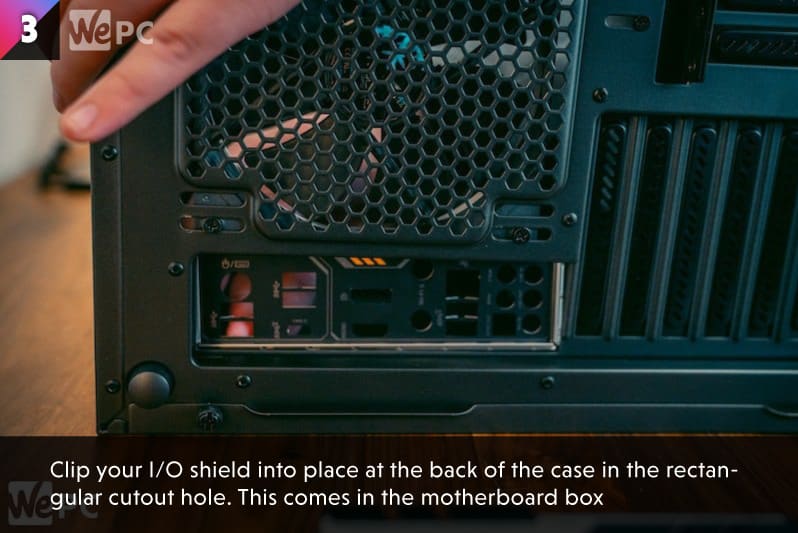
Before you screw your motherboard into the case, clip your I/O shield into the cutout at the back of the case.
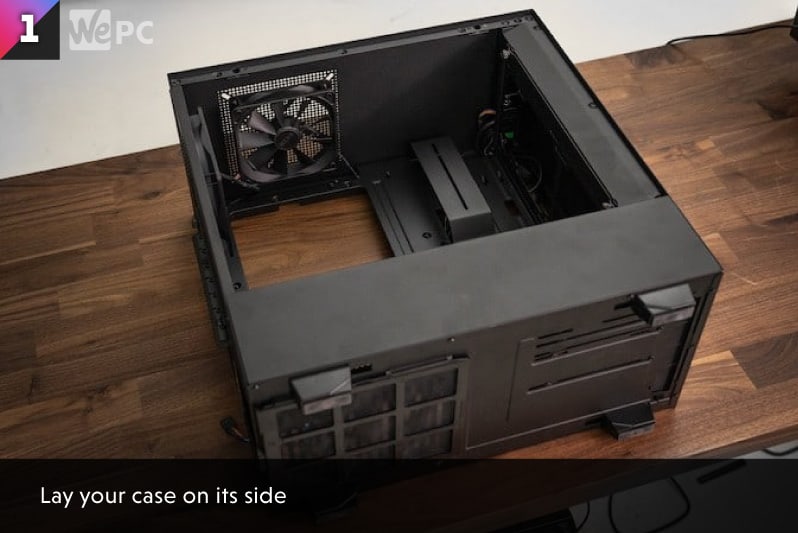
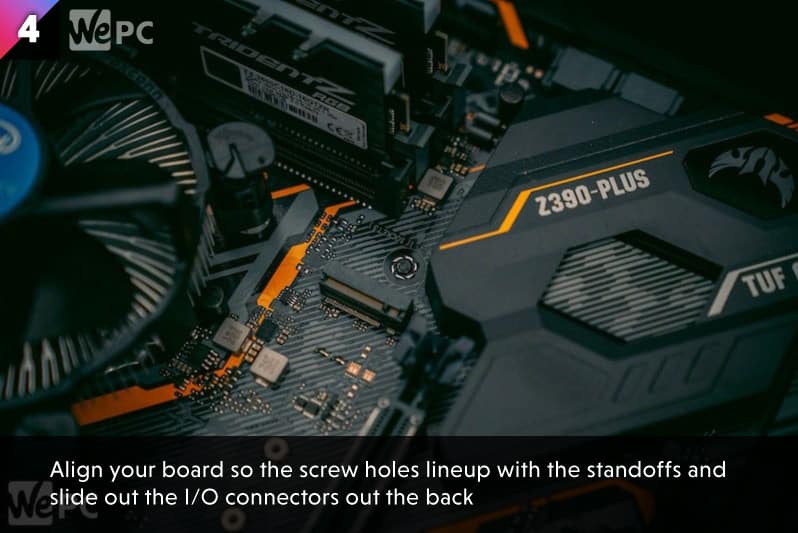
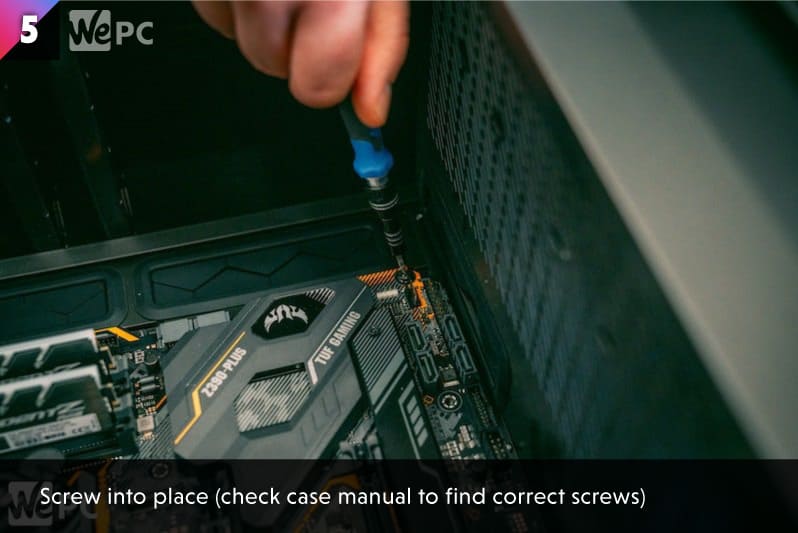
Now the I/O shield is in place, it is time to screw in the motherboard. Lay the case on its side and place the motherboard on top of the standoffs, so the I/O connections poke through the I/O shield. Once aligned, screw the board into place using the screws listed in your case manual.
Don’t worry about connecting your front panel and PSU cables just yet, we will do that a little later on.
✓
Tip
DO NOT screw the motherboard in without standoff screws at each hole. If you lose your motherboard screws, power supply screws can also be used to secure the motherboard to the standoffs
Step 6.1: Install Storage (SSD/HDD)
Parts and tools required: Motherboard, Case, I/O shield (if not attached to MOBO), Screwdriver
If you have bought an M.2 type storage device only, skip this step.
Check your case and look for the best spot to mount your SSD/ HDD. Some cases have many different mounting options available, often inside just behind the front panel, or at the back panel. It is not important where you choose to mount your drives but have cable management in mind when you pick a spot as you want to make your PC build look as clean as possible.
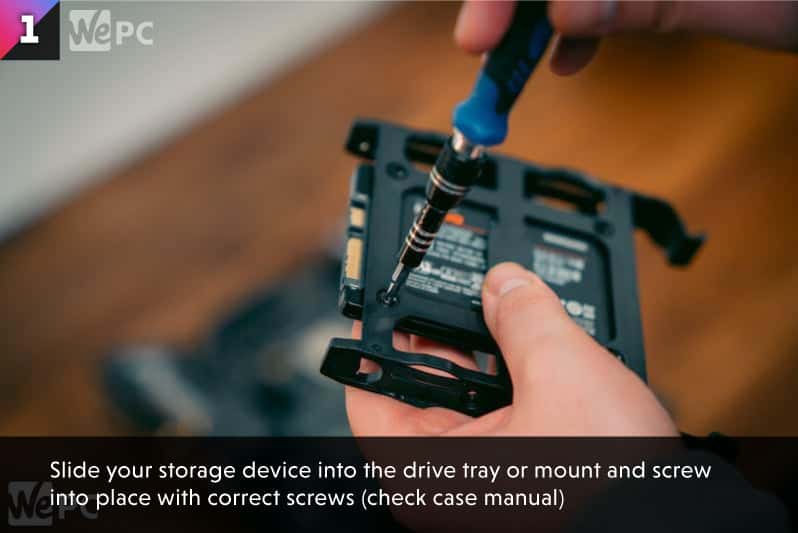
Some cases come with “tool-free” installation, which means your drive should just clip into the drive tray. Other cases will usually require you to screw the storage device into place.
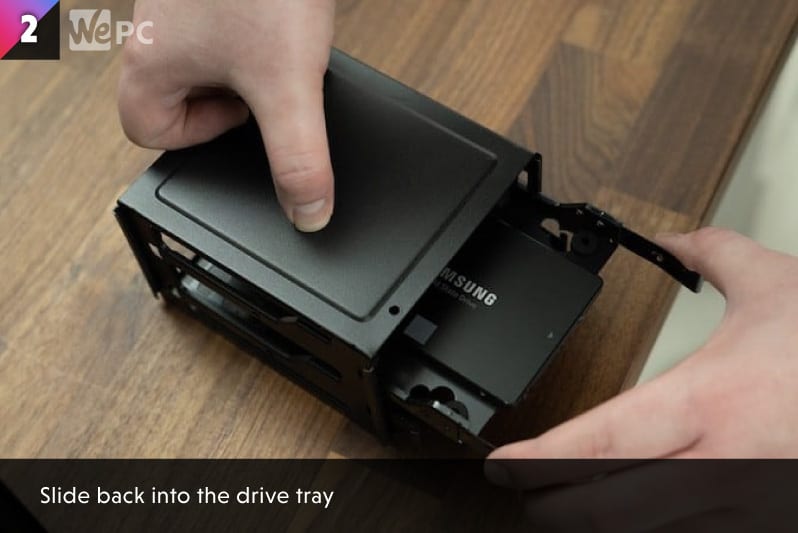
Remove the tray and line up your storage device. You will want to orient the device with the SATA connectors facing the back panel as this is where you want your cables to run. Once aligned, screw into place and slide the tray back into the drive bay. In some cases, the drives use the same screws as the motherboard but always consult the case manual.
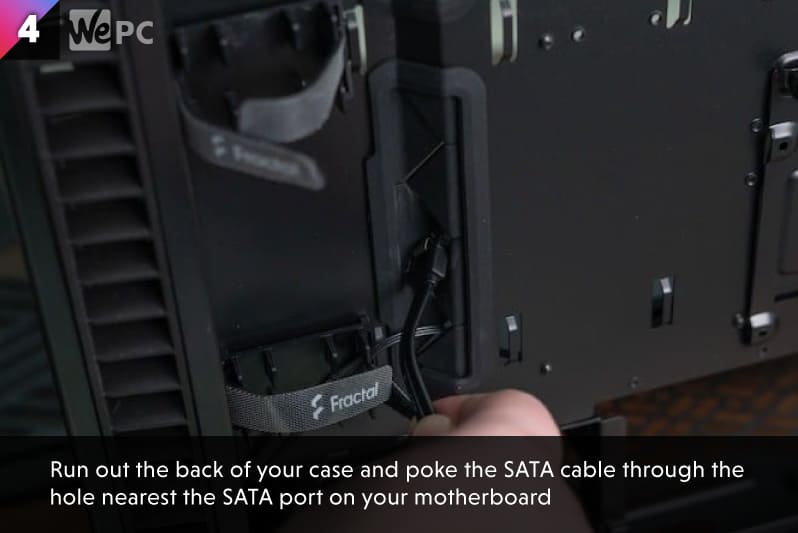
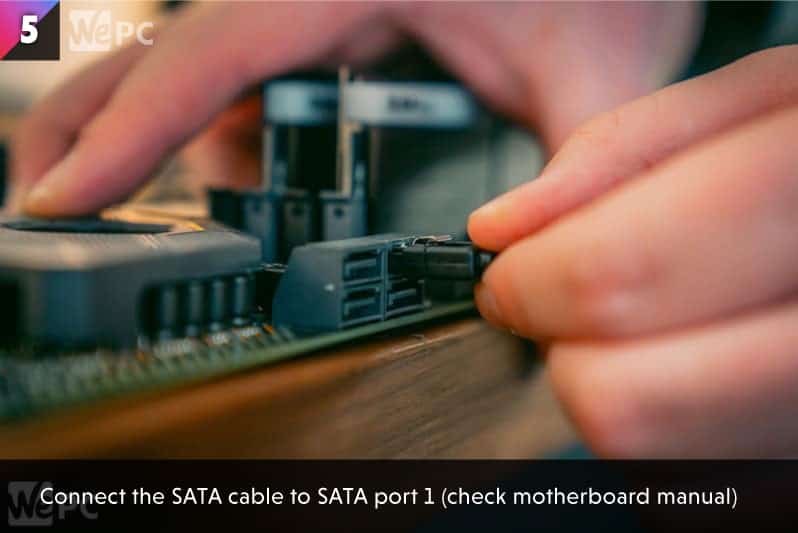
Once in place, you can connect the SATA cable that comes in your motherboard box to your storage device, run it through the back and into the motherboard. To connect this into the correct SATA port, consult the motherboard user manual but make sure the boot device is plugged into SATA1.

✓
Tip
A 2.5” SSD drive can usually be mounted to a 3.5” HDD tray but not vice-versa.
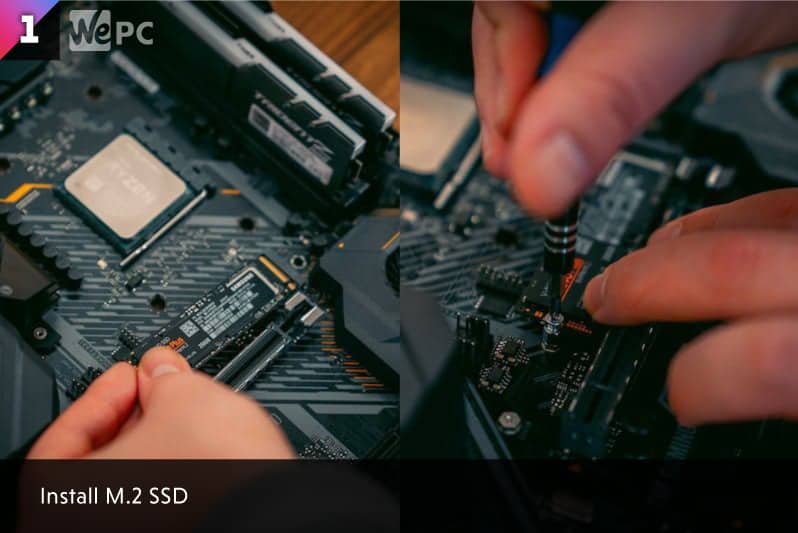
Step 6.2: Install M.2 SSD
Parts and tools required: Motherboard, M.2 SSD, Screwdriver, M.2 screw from motherboard box
Locate the small, horizontal slot for the M.2 on your motherboard. Once found, remove the screw, if already in the board, and slide the M.2 into place. The storage device will flip up slightly at a 35-degree angle, as it needs you to screw it down. Push the SSD down, and screw the small screw to lock the device.
Step 7: Install The Graphics Card (GPU)
Parts and tools required: Installed motherboard, Screwdriver
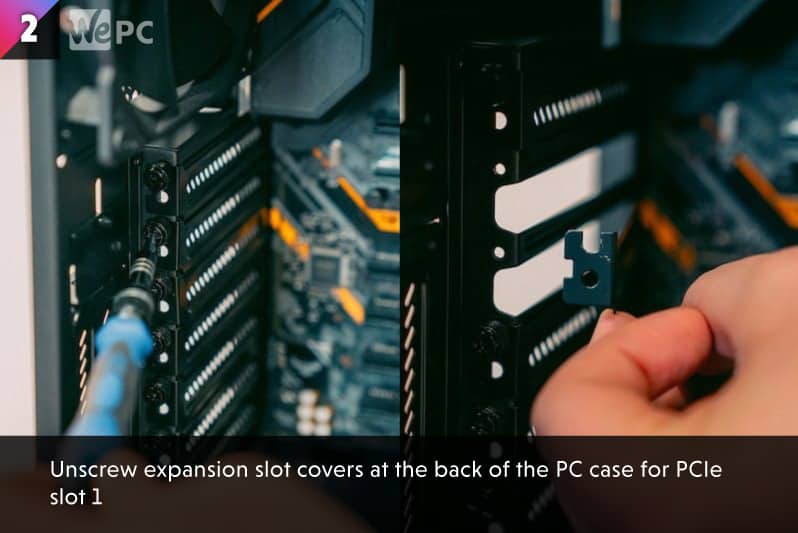
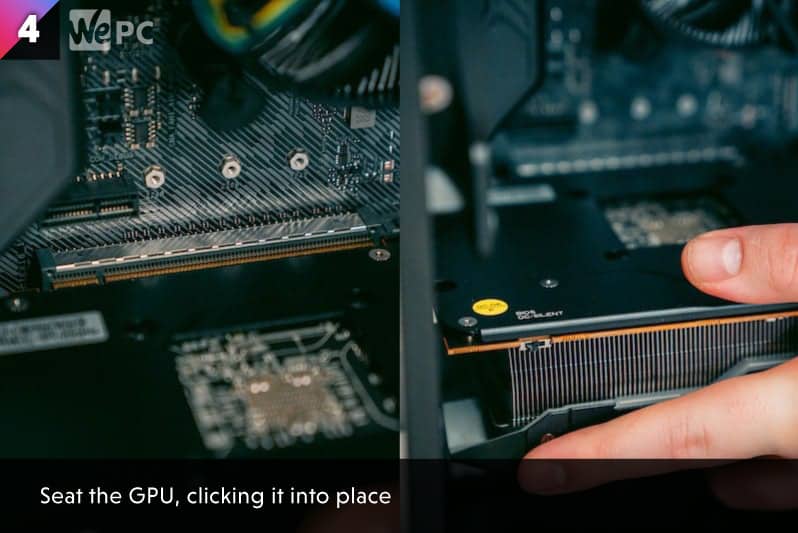
Locate the PCIe x16 slot on your motherboard (usually the one at the top, but consult your motherboard manual). Which slot you use depends on what other components are inside but generally speaking, the top is the one to go for, leaving space near the bottom.
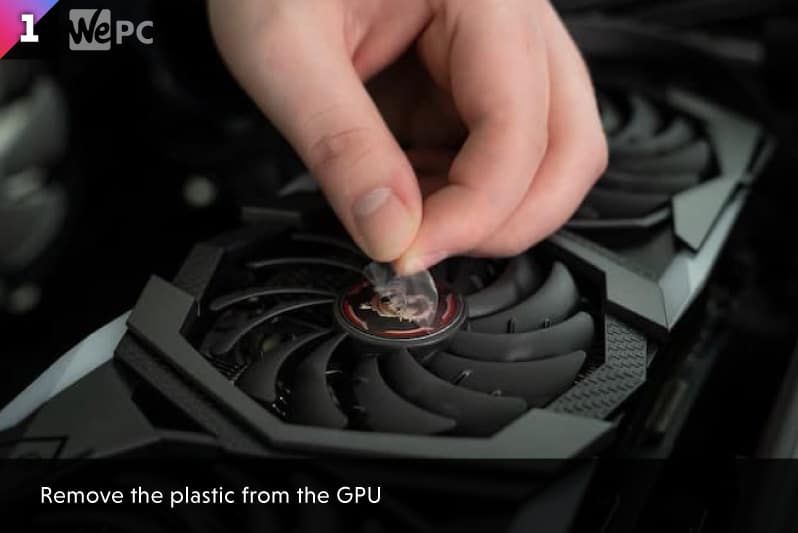
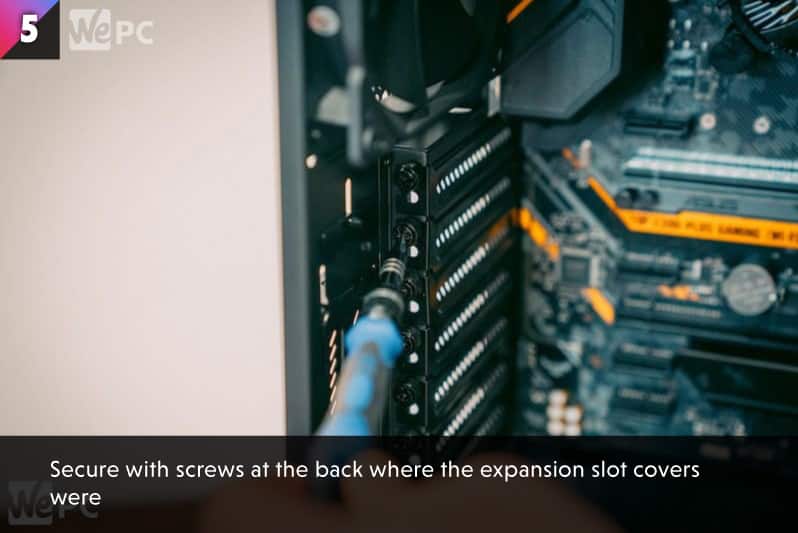
Before installing the GPU, ensure you remove all plastic from the graphics card. Next, remove the back metal covers for the expansion slots, so you can plug in your DisplayPort or HDMI cable. These metal covers will be screwed into mid-high-end cases, with some budget cases requiring you to snap these out.
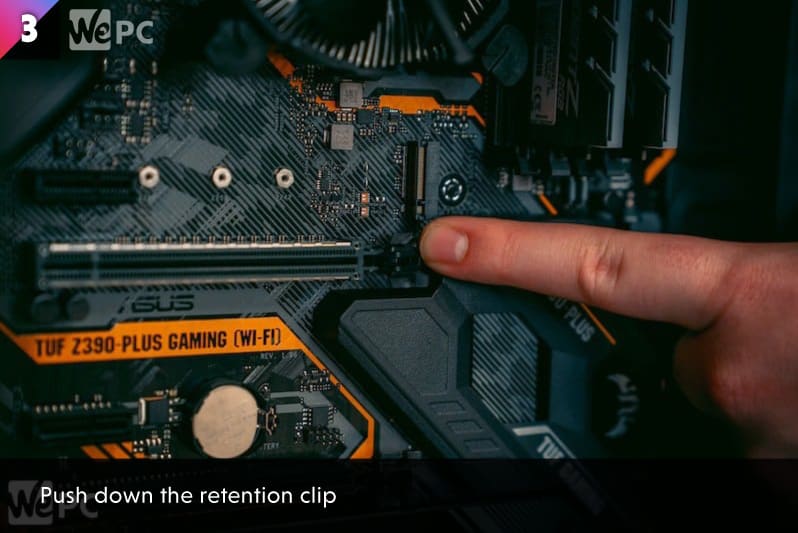
Now there is space for the GPU, push down on the retention clip on your motherboard’s PCIe slot and slide the GPU in till you hear a click.
Once clicked into place screw it in securely.

✓
Tip
If your PC case didn’t come with a screw to fix the GPU in place, you can use a spare PSU screw
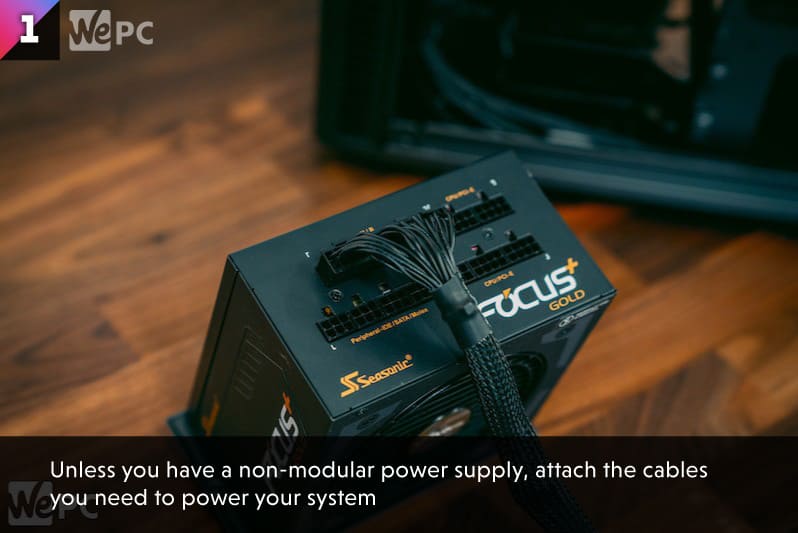
Step 8: Install The Power Supply (PSU)
Parts and tools required: Case, PSU, Screwdriver
If you have a semi- or fully-modular PSU, work out what cables you are going to need in your build and plug in accordingly. The PSU will usually have labels on everything to make this step a bit easier.
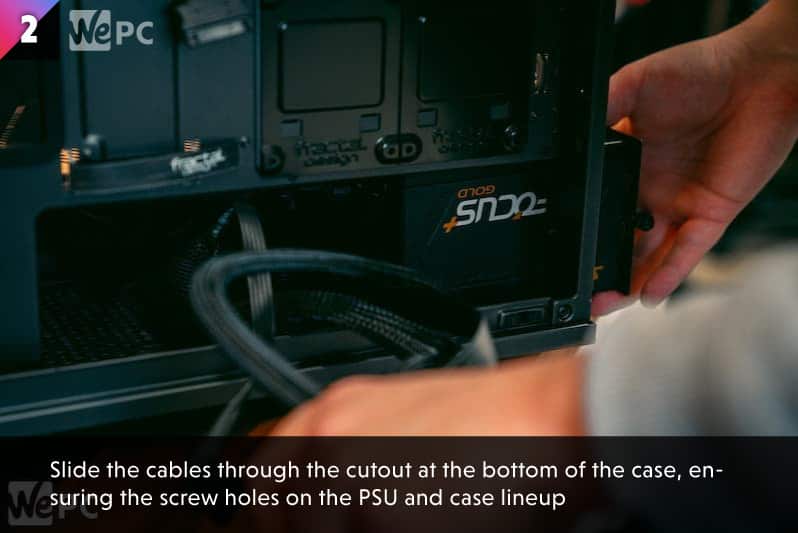
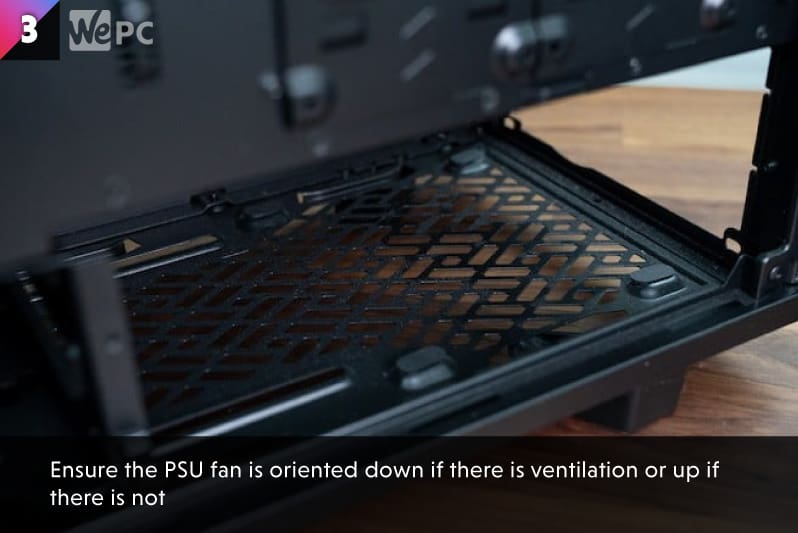
Once the cables are plugged in, feed them through so your power supply sits flush with the case. Make sure you orient the PSU fan down if there is ventilation at the bottom or upwards if there is no ventilation.
The PSU and your case will come with the required screws (4X), simply screw these into place.

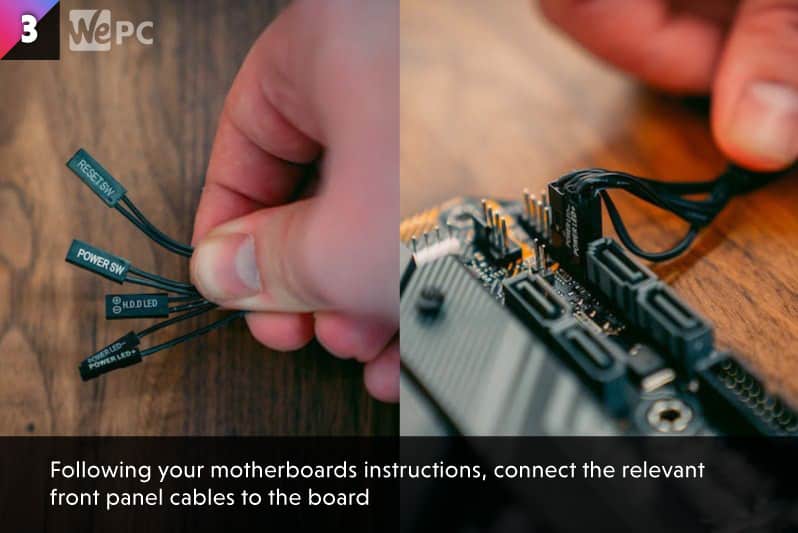
Step 9: It’s Time To Cable Up The Front Panel
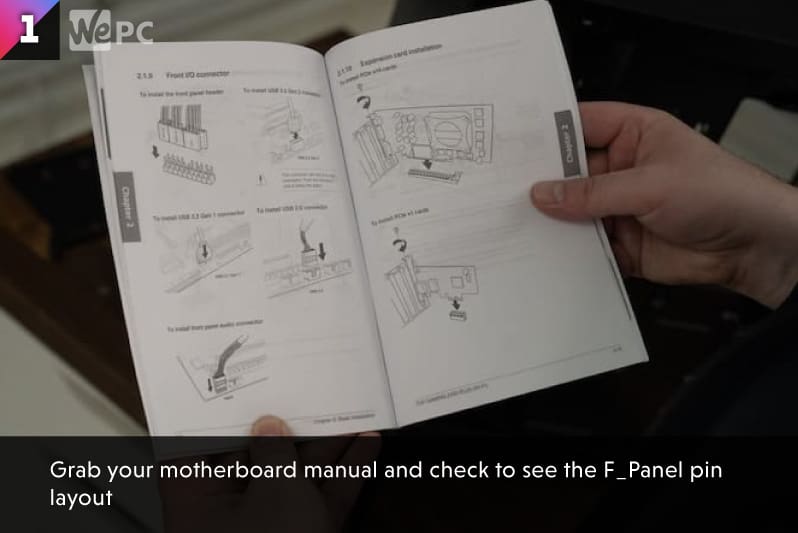
Parts and tools required: Case cables, Installed motherboard, Motherboard user manual
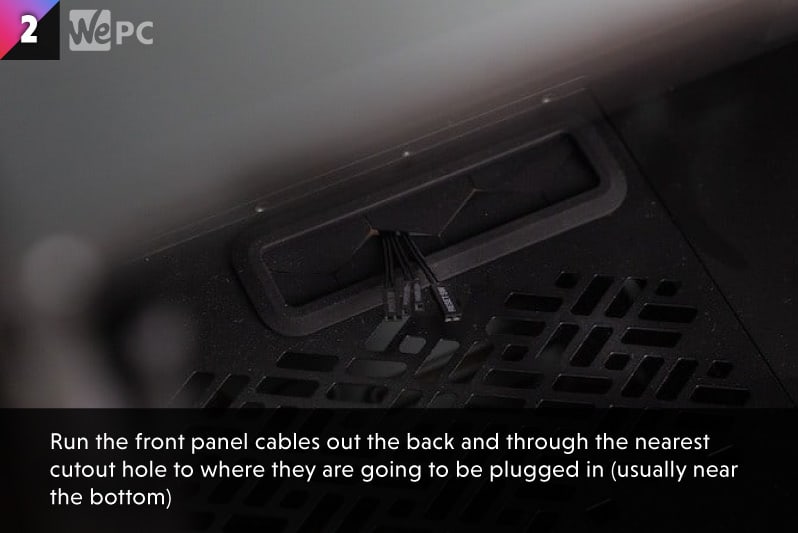
First, we are going to cable up the front panel of your case to the motherboard. This is the trickiest part of the build but that is just down to it being quite fiddly. Make sure you have run your front panel cables out the back before starting.
Consult your motherboard manual to locate where your front I/O cables will be going. Once located, feed the cables through the nearest cutout hole. Follow the diagram and connect the cables as it mentions.
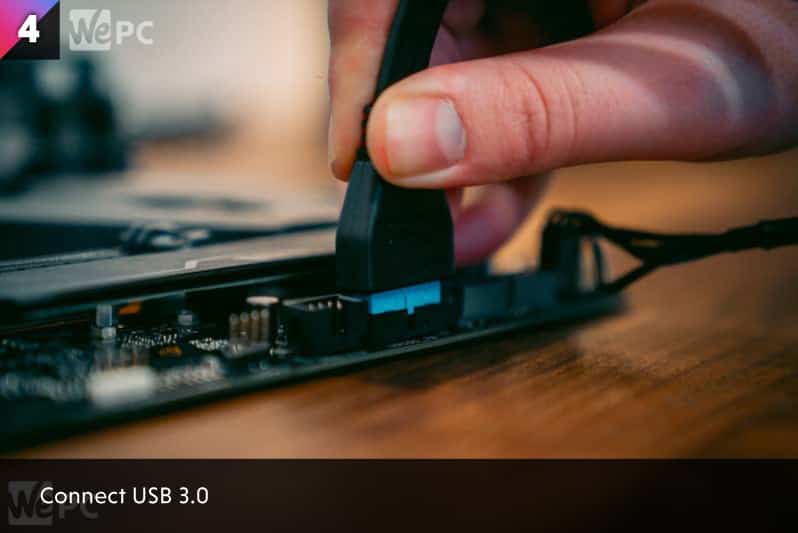
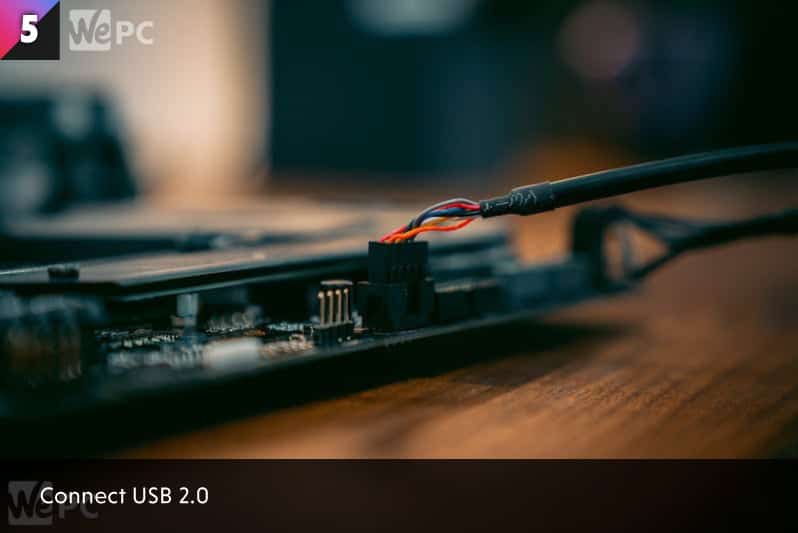
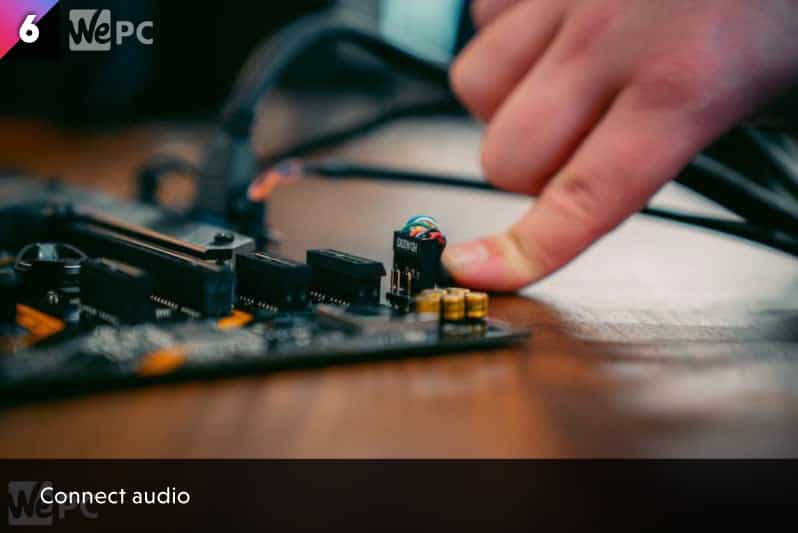
Once your front panel cables are all connected (PWR L.E.D, HDD L.E.D, PWR Switch, Reset Switch, USB, USB 3.0, HD Audio) it is time to connect your power supply cables.
✓
Tip
If you check the underside of the PWR L.E.D, HDD L.E.D, PWR Switch, Reset Switch cables, you will see a small arrow etched into the plastic. This arrow indicates which pin is + (positive)
✓
Tip
You will find it easier to plug in the bottom layer of front panel cables first as it can be fiddly for large hands
Step 10: Let There Be Power
Parts and tools required: PSU cables, Installed motherboard, Motherboard user manual
After previously installing your PSU, your cables should all be hanging out the back. Now it is time to feed these different cables back through into the front of the case in the adjacent cutout holes.
Grab your motherboard manual if you need assistance in where to plug the various cables.
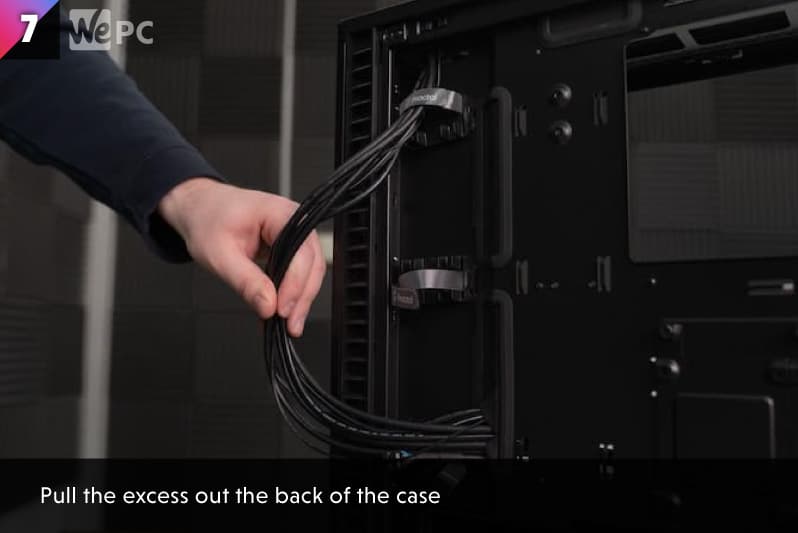
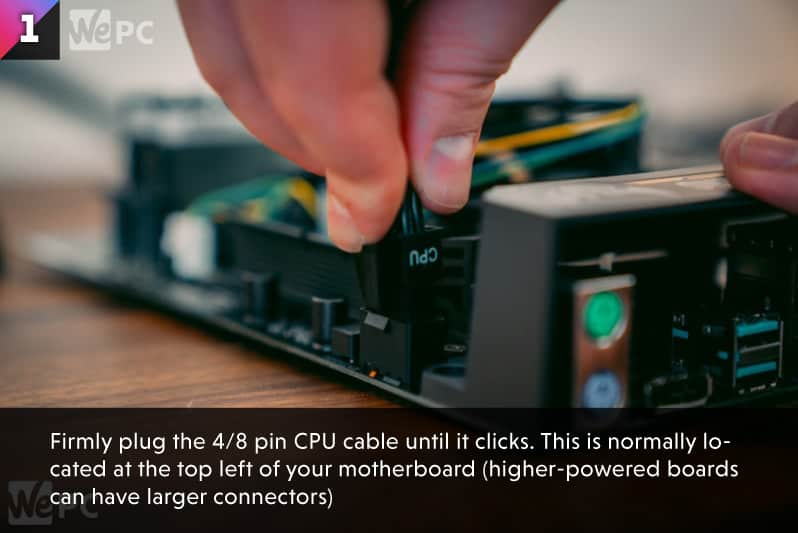
If your case has a cutout near your back I/O shield at the top, this is where your CPU power connector will go. Feed the cable through this hole and simply plug this into the port on your motherboard, pulling the excess out the back once you hear the click.
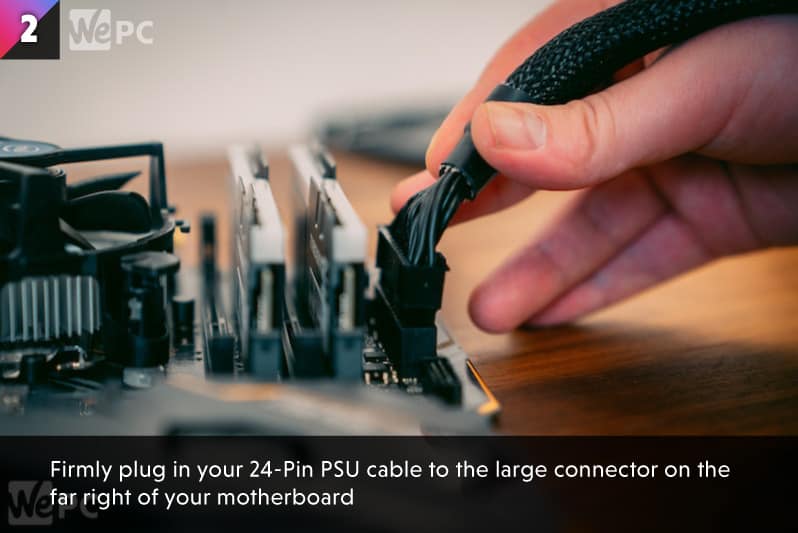
Now the CPU has power, you are going to feed the large 24-pin power cable through the hole nearest its port. Wait for the click and again, pull the excess cable length through the back.
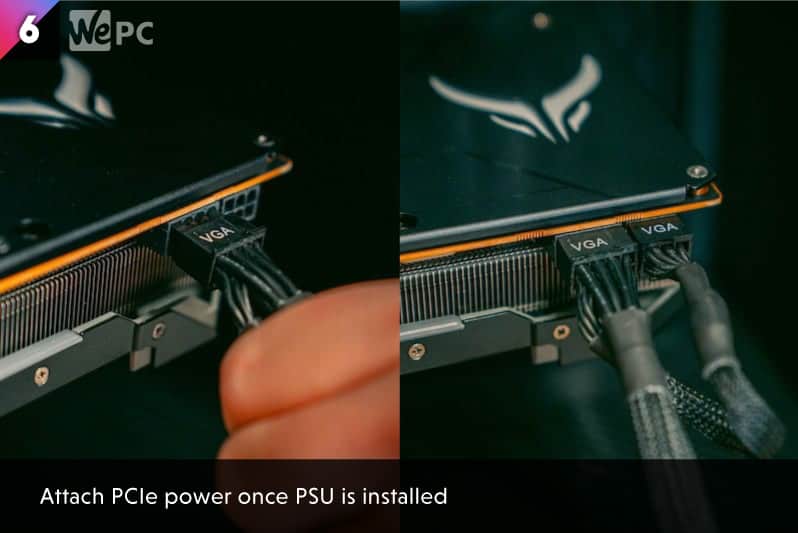
Your graphics card needs power too, grab your PCIe power cable and slide this through the nearest cutout. Plug this into your GPU and again, pull the excess out the back panel.
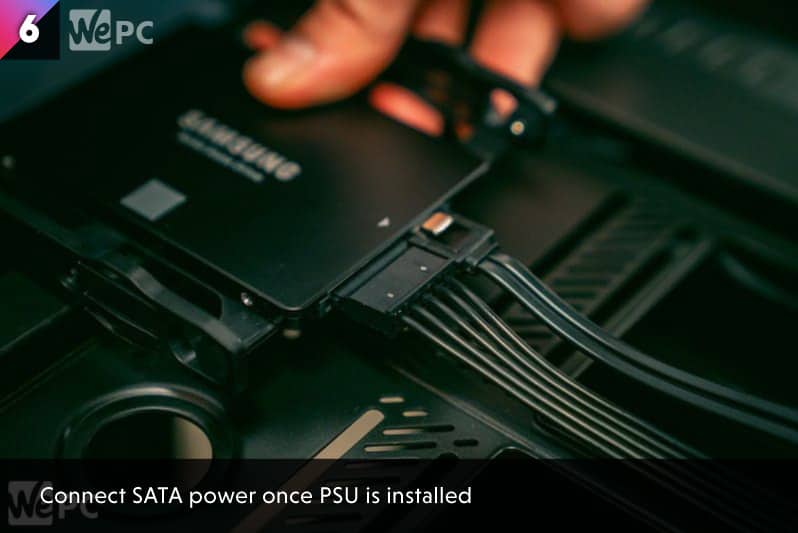
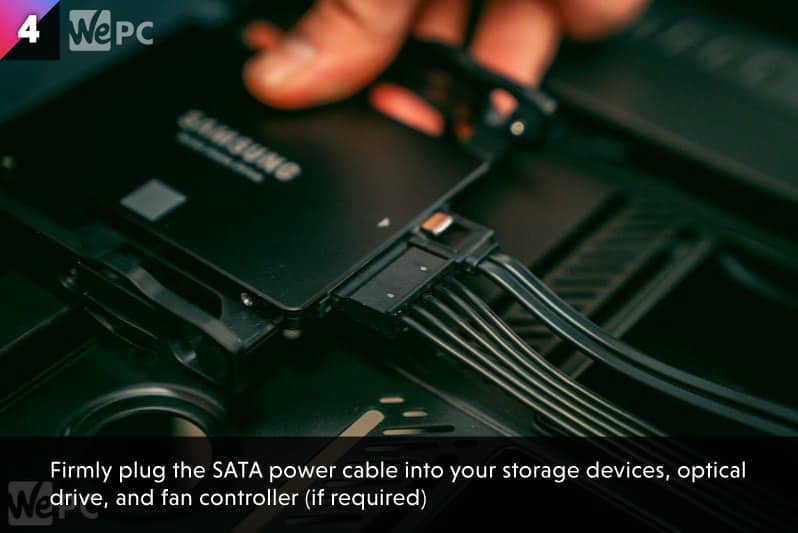
Lastly, your storage devices (unless you have an M.2) will need power too. Plug the SATA power into the back of your storage device and pull the excess out the back.

Step 11: Install Operating System (OS)
Parts and tools required: Built PC, Monitor, Keyboard & mouse, OS on a flash drive
Once built and the PC successfully posts to BIOS, it is time to install your operating system. If you have purchased Windows on a flash drive or downloaded the installer for Windows, you are going to need the product key at hand.
Plug your flash drive in, load the PC and enter the BIOS. Once in the BIOS, you may need to change the boot priority so that when your PC loads up, it does it from the USB drive with Windows on it.
Once the boot order or priority has been changed, save your changes and exit. On restart, you should see the Windows installation guide.
For further help with Windows installation, visit our in-depth guide on how to do this process.
Let’s build your first computer
As you can see, building your own gaming PC is a rewarding but intricate process. It’s well worth doing though, especially if you’re a serious gamer. Not only will you save yourself a lot of money by not having to rely on purchasing a pre-built PC, but you’ll also be able to customize however you like, allowing you to enjoy hours of world-class gaming.
Budget PC builds

Mid-range PC builds
High-end PC builds
Game-related PC builds

How to build a gaming PC: FAQs
What tools do you need to build a PC?
- Workstation (flat surface)
- Screwdriver (Phillips)
- Antistatic bracelet
- Thermal paste
- Isopropyl alcohol
- Paper towel/ lint-free cloth
- Cable snips + cable ties (optional)
What is a good budget for a gaming PC?
The higher the better isn’t always the best course of action. After a certain point, the returns of your PC build begin to diminish. In the current market, we think around $1200 could be a good budget for a gaming PC. Sure, it would be lovely to splash $2000 on a brand-new gaming rig but for the vast majority of us, 1000- $1200 is a good starting place. At this price, you can have an excellent PC for gaming in 1080p, with some performance at 1440p too. 4K would be considered a bit of a stretch at this price point.
Is it worth building a PC for gaming?
So, you’ve worked out your budget and have a better idea of what you can afford. You also know what you want your PC to be capable of.
Now it’s a good idea to think about whether building your own PC is the best choice or if purchasing a pre-built gaming PC is a better fit for your budget. There are pros and cons for each, so let’s explore these in more detail below.
Is it hard to build your own gaming PC?
No, the main concern for many newbie PC builders is compatibility issues and damaging parts. Compatibility can be sorted out with a small amount of research, there are tonnes of online help to ensure you get the correct parts for your new PC. In terms of damage, as long as you follow guides like ours and take your time, you have nothing to worry about.


If I get a pc I want it to be the best of the best. So I picked some parts.
NZXT KRAKEN Z73 LIQUID CPU COOLER
AMD Ryzen 9 5900X
Team T-FORCE Delta RGB 32GB (2x16GB) DDR4 3600MHz 1.35V RAM –
BlackSeagate Barracuda 4TB ST4000DM004 3.5in Hard Drive
MSI B450 Gaming Pro Carbon Max Wi-Fi AM4 ATX Motherboard
Gigabyte GeForce RTX 3060 Gaming OC 12GB
Cooler Master MasterBox TD500 Crystal ARGB Case
EVGA SUPERNOVA P+ 1300W POWER SUPPLY
I have been playing on console all my life and a wanted to upgrade to pc, my plan was to save up $2,000 bucks and build one. But I have never touched computer parts and followed your parts guide roughly (by roughly I mean looked at what every one recommended and was compatible) and looked up some parts from other places. So I came up with this:
CPU: AMD Ryzen 9 5000X
CPU cooler: Be Quiet! Rock Pro 4, Bk022, 250W
MOBO: ASUS ROG Strix X570-E Gaming
GPU: ASUS GeForece RTX 2080 8 GB OC
RAM: Corsair Vengeance LPX DDR4
SSHD: Seagate Barra Cuda 3TB
PSU: Corsair RM 750X
Case: Lian Li PC-011 Dynamic ATX Full Tower Case
I looked at the math and I am over budget but if you could check every thing and give me some help that would be great thanks.
Hey I just finished my first PC build tonight by following the $1000 build and this guide, but I’m having a bit of an issue. I’m trying to install my Windows 10 OS on a flashdrive, but when it’s hooked up to my monitor it doesn’t pick up anything being outputted by the PC. I know my monitor and hdmi cable is fine because it’s the same I use for my ps4. The computer lights up and everything, so I thought it was working, but even restarting doesn’t result in any output. It doesn’t have anything pop up, not even a BIOS. Sorry for asking, but it’s hard as hell to find a guide that can explain why a newly built PC isn’t popping up with anything. Thanks!
Can you recommend an Intel build for 1000 euro budget?
Thanks for the Tutorial
Im actually thinking of streaming on Twitch and uploading on YouTube so I need a pc….
I chose an APU because I felt installing a GPU Would be really hard..
Here are my parts:-
APU-AMD Ryzen 3 3200G with RadeonVega 8 Graphics Desktop Processor 4 Cores up to 4GHz 6MB Cache AM4 Socket
Case-Corsair Carbide Series CC-9011050-WW Mid-Tower Steel Gaming Case with Red LED
Motherboard-Gigabyte B450M DS3H
RAM-Corsair Vengeance LPX 16GB
PSU-Corsair CXSeries 450 Watt PSU
SSD-Seagate 2TB Firecuda Internal Solid State Drive (SSD)
Thanks a bunch for writing this Article. This is actually pretty Useful if you don’t know how to build a PC.
Please Reply back if you think anything could improve my PC’s performance.
Thanks
I would definitely get a GPU if you’re looking to do Twitch and YouTube – especially for gaming. Maybe look at something entry-level like an RX 580 or something.
You really need to get a GPU like Charlie say, buy a RX 580 or a 5500 XT for better gaming performance, for streaming im not a expert but i believe that a better CPU is welcome – more cores and cache memory
Hello! This is a really great article, and I really want to transition from a Mac to a PC. I really want to build my own. What GPU would you recommend to play Fallout 4 off of Steam? 🙂
A 1080 super might be fine but i’m not too good at this stuff
I would greatly appreciate help cutting budget on parts to 1000-1100 dollars including monitor. I will be playing games like COD MW and future COD franchises. I’m fairly new to computer building so this would be a great help. These are my parts:
CPU:Ryzen 5 3600X
Motherboard:GIGABYTE B450 AORUS ELITE
GPU(which im looking to cut price on):MSI Gaming GeForce RTX 2060 Super
RAM:Corsair Vengeance LPX 16GB (2x8GB)
SSD:Samsung 970 EVO Plus Series 500GB
PSU:Thermaltake Smart RGB 500W 80 Plus
Thank you so much
You could get a 5600XT for under $300. They’re excellent gaming CPUs and should provide decent 1440p performance. https://www.youtube.com/watch?v=3UxJOX7sGwQ
Here’s a benchmark we ran of the 5600XT – you can see some Call of Duty gameplay from 3:54 onwards.
So for games like warzone and the new cod cold war coming out soon, and also things like ark:survival evolved, would this be a good build? I have a 500 budget btw.
Cpu: AMD Ryzen 3100
Mobo: Gigabyte B450M
RAM: XPG Z1 DDR4
Ssd: Silicon power 256Gb
Psu: EVGA 100 BR 0500 k1
Gpu:Gigabyte Gv-N165SWF2OC-4GD GeForce GTX
Case:Cougar MG130-G Compact Micro-ATX
Also I’m new to pc building so what is overclocking and how do I do it? Also ik s my case good for fans?
not particularly. You would almost certainly require a far more powerful GPU. The CPU may be OK – I would recommend a 1660 or above.
So I’m creating my pc build right now (I’m building it myself) but I’m not done just wanted to see if you see if my parts are adequate for COD warzone being my most demanding game.Also do I want SSD or HDD for my drive. Thanks a lot.
My parts so far are: CPU: AMD Ryzen 3600X(6 core 12 thread)
Motherboard: ASUS ROG Strix X570-E
GPU: Gigabyte – Geforce GTX 1660 OC 6GB with 2 windforce fans 162 Bit 6GD Video card
RAM:Corsair Vengeance LPX (x2 8GB) DDR4
You definitely want to go for an SSD over an HDD – especially for your operating system and primary games. You’d be looking at around 90FPS on high settings – 1080P. You’d get around 60FPS @1440p
Thank you it’s been awhile since I wrote this and I have changed my parts since. But thank you for the insight
Clarification: I’m a first-timer, and I’m hoping to go beneath $550 with my completed build, not counting monitor, mouse or keyboard. With the money I could save from putting off purchasing a 2GB VRAM video card, I could get a more powerful CPU that has some neat integrated graphics that could tide me over with my aforementioned 1080p gaming and officework until I can easily afford said video card. In conclusion, here’s a better question: What’s the best course of action, given the circumstances? Any specific recommendations? Thanks.
Yea, why not check out our $500 – $600 gaming PC builds. They have been designed to get the absolute best performance out of that specific budget.
https://wordpress-529474-2504280.cloudwaysapps.com/builds/best-gaming-pc-under-500/
https://wordpress-529474-2504280.cloudwaysapps.com/builds/best-gaming-pc-under-600/
Hello, I currently play on a PS4 but I am looking to go to pc as soon as I can. I want to be able to run games such as cod warzone, black ops, and r6. I want to build my own so should I have a relatively large budget for this?
You probably want to give yourself a budget of at least 800+. I’d recommending checking out our best PC builds for 800-1000. I’ve linked them both below
https://wordpress-529474-2504280.cloudwaysapps.com/builds/best-gaming-pc-under-800/
https://wordpress-529474-2504280.cloudwaysapps.com/builds/best-gaming-pc-under-1000/
Intel Core i9-9900K Desktop Processor 8 Cores up to 5.0GHz Unlocked LGA1151 300 Series 95W (BX806849900K)
Thermaltake Pacific DIY Liquid Cooling System CL360 64mm Thick Copper Radiator CL-W191-CU00BL-A,
Thermaltake Pacific DP100-D5 Plus 360mm 200ml 16.8 Million Color RGB Alexa/Razer Chroma/5V Motherboard Syncable 6-Port G 1/4
Thermaltake Pacific C360 Ddc Res/Pump 5V Motherboard Sync Copper Radiator PETG Hard Tube Water Cooling Kit CL-W243-CU12SW-A,
Thermaltake View 31 RGB Dual Tempered Glass SPCC ATX Mid Tower Gaming Computer Case Chassis, 3 RGB LED Ring Fans Pre-installed CA-1H8-00M1WN-01,
WD_Black SN750 1TB NVMe Internal Gaming SSD – Gen3 PCIe, M.2 2280, 3D NAND – WDS100T3X0C,
Corsair Vengeance LPX 32GB (2x16GB) 3200MHz C16 DDR4 DRAM Memory Kit – Black, Opens in a new tab
Asus ROG Strix Z390-E Gaming Motherboard LGA1151 (Intel 8th 9th Gen) ATX DDR4 DP HDMI M.2 USB 3.1 Gen2 802.11AC Wi-Fi,
Gigabyte GV-N207SGAMING OC-8GD GeForce RTX 2070 Super Gaming OC 8G Graphics Card, 3X Windforce Fans, 8GB 256-Bit GDDR6, Video Card,
Thermaltake Toughpower PF1 ARGB 850W 80+ Platinum 16.8 Million Colors 18 Addressable LEDs 5V Motherboard Sync/Analog Controlled SLI Full Modular Power Supply PS-TPD-0850F3FAPU-1
Gonna try and put this together myself. Anything look like it doesn’t belong or like it’s not money well spent. Thanks for help!!
What about someone that has a budget for over $7000. Not for editing but for rendering big files and smooth workflow. Thanks!
I have considered putting something like this together. Maybe a future project!
Hey Charlie, could you help me figure something out real quick? I’m buying a setup to build for my little brother and he plays Fortnite, Call of duty War zone and Grand theft auto … but thats all he really plays and he currently has an Xbox but is looking to have a pc because he can get much better FPS and gaming quality out of a pc especially on fortnite and warzone…. but I’m not to knowledgeable on pc builds so….. What would be the best build for those games he play to be able to get a really good quality and really good Fps on the fortnite and warzone???????
Hey Matthew, hope you’re well. Fortnite and GTA are both fairly low-intensive games that don’t require much computational power. However, COD:Warzone is much more demanding, meaning your PC is going to tailored towards that game – and will likely far exceed the performance demands of the latter two games. That said, I’d start by taking a look at our $1000 gaming pc – https://wordpress-529474-2504280.cloudwaysapps.com/builds/best-gaming-pc-under-1000/ – this is the perfect starting point for what you’re looking for. If you didn’t mention Call of duty, I’d be recommending the $500-600 builds. However, they simply won’t push the high frame rates you’re looking for. I hope this helps.
it says in the article that
“The main difference between a low-end motherboard and a high-end one is overclocking capabilities. To overclock your CPU:
With Intel CPUs, you’ll need both a K-series CPU and a Z-series motherboard.
With AMD CPUs, you’ll need B- or X-series motherboards. All modern AMD processors are overclockable.
Once you’ve decided whether you want overclocking or not, it’s time to decide your MOBO and corresponding case size: ATX, MATX, or ITX? (There are other sizes, though.)”
what if i don’t want to overclock? is it a bad idea to have a PC that can’t overclock, even if i don’t want to overclock? also, how can I tell if I’m overclocking?
Buying products that can be overclocked gives you extra options in the future to get a performance boost at no extra cost. There are many people that won’t bother overclocking and it is absolutely no issue at all, so no it isn’t a bad idea to not want to overclock.
Overclocking is done in the BIOS so you won’t be overclocking unless you manually do so.
ohhhh ok thank you so much! sorry for asking stupid questions haha
Hello, I am 9 so I am not really sure if the Seagate Barracuda 1TB 3.5″ Desktop Internal Drive is an SSD or RDD. Could someone help me out?
The Seagate Barracuda 1TB 3.5″ is an HDD. Hope this helps.
Hey man its a hard drive not an ssd a 1tb hdd would be over $150 or £100
Hey! what do you think would be a good PC to be able to do Simulators
I need one capable of doing X-Plane 11 and Car simulators smoothly.
Plus a good reference of a 27″ monitor or wide one that can run that PC would be great.
The 500-600 dollar builds would be a great place to start:
https://wordpress-529474-2504280.cloudwaysapps.com/builds/best-gaming-pc-under-500/
https://wordpress-529474-2504280.cloudwaysapps.com/builds/best-gaming-pc-under-600/
I think you need a video on how to install a graphics card, a water cooling system, shard drive and an ssd like the Samsung 970 Ebola plus which does not install the same way as the one in the video
Hi Samuel, All coming in good time my friend :]
i want a computer like this it contains a
Seagate BarraCuda 510 M.2 2280 256GB PCIe G3 x4, NVMe 1.3 3D TLC Internal Solid State Drive (SSD) ZP256CM30041
a
AMD RYZEN 5 3600 6-Core 3.6 GHz (4.2 GHz Max Boost) Socket AM4 65W 100-100000031BOX Desktop Processor
a
Home / Computers & Accessories / Computer Cards & Components / Motherboards / Motherboards / Product Details
Gigabyte Ultra Durable GA-AB350-Gaming Desktop Motherboard – AMD Chipset – Socket AM4 – 64 GB DDR4 SDRAM Maximum RAM – DIMM, UDIMM – 4 x Memory Slots – Gigabit Ethernet – 6 x USB 3.1 Port – HDMI – DVI – 6 x SATA Interfaces
a
MSI – NVIDIA GeForce GTX 1650 SUPER 4GB GDDR6 PCI Express 3.0 Graphics Card – Black/Gray
HyperX FURY 16GB 288-Pin DDR4 SDRAM DDR4 2666 (PC4 21300) Desktop Memory Model HX426C16FB3/16
CORSAIR CX Series CX450 450W ATX12V 80 PLUS BRONZE Certified Active PFC Power Supply
all in a
Thermaltake Versa H15 – micro tower – micro ATX case
with a os of
Windows 10 Home – English – Windows
cooled by a
Thermaltake – Pure Plus 12 LED RGB (Triple Pack) Radiator Fan TT Premium Edition 120mm Case Cooling Fan Kit with RGB Lighting – Black
with a mic and camera of
1080P Web Cam HD Camera Webcam with Mic Microphone for Computer PC Laptop Notebook
and a monitor like this one
1080P Web Cam HD Camera Webcam with Mic Microphone for Computer PC Laptop Notebook
Is it a good setup for my pc
Hi Guy, you first want to probably reconsider the motherboard. Look at getting a b450 for latest-gen Ryzen. Also, if you’re going for a micro ATX case, make sure your motherboard is Micro ATX too. The monitor is a webcam, and I’m not sure the radiator is justified in this build. Apart from that though, looks great.
I meant i want this monitor: LG 24MP59G-P. Best cheap gaming monitor btw
sorry for that
Yea that monitor is fine for that kind of build :]
I’m new to buying and making a computer and I will like to know if this would support the oculus rift an other games like GTA V and others
Hello I’m new to this and I’m interested in your $1000 build and I was wondering if I could replace the 16 gb ram with 32 gb ram instead.
You certainly could Alex. If you need the extra power, the motherboard is more than capable of handling that amount of RAM.
I have a 1500 buget. Im interested in sims. Dcs, arma 3,and il2. Is rhat enough for a system that includes vr?
Your budget is more than enough for your needs!
Hi!
I want to change some part’s on my pc .
I have an ASSUS G11cd motherboard and i want to replace with another motherboard better than this.but i need the new motherboard to be the same size like old one assus g11cd ( i need to connect on the new motherboard these components: Geforce gtx 1070 ti , 16 Gb ram 2133 Mhz (if is not exist than 2400 Mhz also ok) , power supply corsair 750 W , intel i7 7700k , ) And i like u to ask how many coolers i have also to buy for videocard or proccesor. which type of cooler i’d love to knew the model.
Thank’s!
Why does the motherboard have to be the same size as the original? And if you’re referring to case fans, you’ll be fine with a generic 2 intake 1 exhaust fan setup.
It will be my first time to try build a pc gaming but you guys make me think I can do it. I will try the $500 Im just need it for some old games and streaming to my NVIDIA SHIELD Do you think is a good option??
Yea the $500 build will be more than enough for those older games.
Im switching from an XBOX to a PC, and am really knew to the PC scene. I was wondering if i were to build one to run games such as TOTAL WAR:WARHAMMER would be my highest demanding game, would the $800 PC build you provided be strong enough? or should i save up a bit more to get a higher spec build? please email me at dkmoore4@outlook.com cause im not sure i will return to the site.
This has really helped me. Because the Xbox one will no longer be supported within the next few years, I thought it be better if I switched to pc now. Thanks to you I used a computer building website and I made a computer! Thanks : )
Glad you enjoyed the article :]
I’m not very savvy with computer hardware, but what do you suggest for ultra graphics on RuneScape 3?
Hi Randy, hope all is well.
If you’re seriously considering playing Runescape 3, any entry-level GPU should be able to run it in ultra.
Thanks so much Charlie!
Hey i am planning to buy a RX 580 8G OC GPU can Acer Nitro VG240Y 24 inches 144hz monitor work on it?
Hi, thanks for commenting. It will work but if you mean will you get 144 FPS with that card then it depends on what games you are playing. Competative titles at 1080p, such as CSGO and Overwatch, yea you are good to go.
I need a gaming pc that is in the 2000 dollar range for gaming and it needs to lates a long time and it needas to have 1 tb ssd and 1 tb hdd eny idea
Hi Kai, check out our $2000 build recommendation – https://wordpress-529474-2504280.cloudwaysapps.com/builds/best-gaming-pc-under-2000/
You said a $400 build will run esports titles decently. I just want to know what do you mean by decently, like how many fps I’m getting playing on high settings?
By decently it does mean with setting tweaks. Playing with everything on high may leave you at a disadvantage as the FPS would fluctuate more often. On low settings, you can expect 100+ FPS.
Hi I would want to build an $800 PC what parts would you suggest for this
Hi Adam, I would suggest checking our best custom build PC for under $800 page. Sounds like it is exactly what you’re looking for. Heres the link
https://wordpress-529474-2504280.cloudwaysapps.com/builds/best-gaming-pc-under-800/
Hey!
I want to bulid a 600dolllar gaming pc so can you tell me which GPU, CASE, PSU, SSD, RAM, MOB and CPU would be best.
I also want you to tell me the company they are from.
Hi W3 S3, that’s great news!
Why not check out our best PC build for under $600?
https://wordpress-529474-2504280.cloudwaysapps.com/builds/best-gaming-pc-under-600/
Let us know what you think.
I want to build a pc that will be able to run VR well. What parts would you suggest me to build with
Hi Jacob, thanks for the comment. What is your budget? for a great setup that is also future proof take a look at – https://wordpress-529474-2504280.cloudwaysapps.com/builds/best-gaming-pc-under-1500/ .
For the most part, this article is a good guide, but there is one thing in here that shocked me considering the info is coming from a website built around gaming pcs. You claimed that not getting Windows and playing on Linux you will only lose “some features.” Don’t you know what most PC titles don’t even have Linux support? You’d lose so much accessibility to games, and if you are looking to build a PC for gaming, then you’d be screwing yourself if you decided to install Linux. Windows 10 is only $100 dollars. This may seem like a lot, but if you are already getting an expensive system anyway, it’s not that much compared to most of your parts. And if you really need to save a buck, just pirate Windows 10, and that actually has some benefits other than saving money itself.
Losing access to games aren’t technically features
Im on a mission to play modded out FS19. I am NOT tech saavy.. this information is EXACTLY what I needed. Thank you.
No problem my friend. Tend to those crops.
Thank you very much man!
This really helped me a lot 😀
Anytime Fabio,
Feel free to ask any further questions if you are struggling.
One of the best blogs for pc building ………..
Thanks Harsh Raj,
You are too kind!
Headed towards PC gaming, total tech noob. This article with the related links is a godsend, thank you.
Happy fragging Howard
very helpful, thx
You are very welcome Payton
Hello Ben Johnson and everyone here. I come from Cambodia.
i have build a PC with specs below :
– CPU : Intel(R) Core(TM) i7-8700K CPU @ 3.70GHz
– RAM : 16.0GB
– VGA :NVIDIA GeFore RTX 2060
Can you give me some advice to pick up a good one monitor that fit to this Graphic Card.
My current monitor is : AOC I2281. I don’t know this monitor is good for me or not so i need help from you. Thank you………………!!!
Welcome from Cambodia! Take a look through our monitor run down, each of these would be a good selection for your new and improved PC.
Very helpful. Thanks.
Very welcome Kody
this will def help ty.
Anytime Shantel. Glad we could be of service
Great article but do you have a guide as to the installation guides?
I thought I was going to see the very same step by step guide, as the title of this article actually stated. Kinda disappointed here……
Hi William,
Comin soon my friend.
Dudeeeee! That was lit.. Very comprehensive and easy to understand. Thanks.
That’s what we do here Eddie, Glad you enjoyed
One of the most detailed and simplified, helpful guides I have seen. Sincerely, thank you.
Thanks Christian, glad we could make the process much easier for you!
thanks for the help this article was amazing
Anytime Jack, feel free to fire some questions our way if you need!
I have always wanted to make my own gaming PC. I have always been afraid of picking the wrong items and have always bought pre-built ones because of it.
Your article was so helpful. I feel confident in creating one by myself now. Thank you so much!
That’s great news Colby! Let us know what you end up building! We’d love to hear.
Really helpful!This is EXACTLY what I needed so much help!!Thanks!
No problem Aidan, happy to be of service.
Thanks dude, this was very useful 🙂
Ferhan this was very good to hear!
Nice article dude!
yeah thats really good
Great reply, Great name. Glad we could help!
Dope asf I couldn’t ask for more. Thanks to whoever put this together… Now I can test from my relentless internet searches🤧
Hi there, I’m looking to build a gaming pc for my son, the budget is around $800, he has currently a curved jvc led 32”. The resolution says its 1366×768. Is this a suitable monitor for that price range build?
Hi Chris, it depends on the games. Is the TV 1080p or higher? If it is 1080p it should be fine. Just in case you haven’t looked at our recommended $800 build, here’s a link- https://wordpress-529474-2504280.cloudwaysapps.com/builds/best-gaming-pc-under-800/
We’re glad you enjoyed Matthew!
What if I want water cooling system? how would I fit that in?
There are many things to consider when it comes to water cooling. We will have a comprehensive guide to water-cooling coming in the near future. So stay tuned.